
So after building the kit and testing that it worked .. It was time to get creative ..
there are some examples on what to do code wise on the AIY kit voice site
First I had to go through the billing set up and processes. Even though the code is free, and the kit is free and they give you $300 worth of credit – you still have to set up billing. It was a pain as I already had a cloud dev account for some of the APIs I use on bit of my sites, but eventually I worked it out – I may have cussed a little. Once that was sorted and I created the credentials I needed I could copy those to the right place and I was good to start experimenting.
There is even a quick script that checks it all for you .. if there are any errors – you have missed a step.
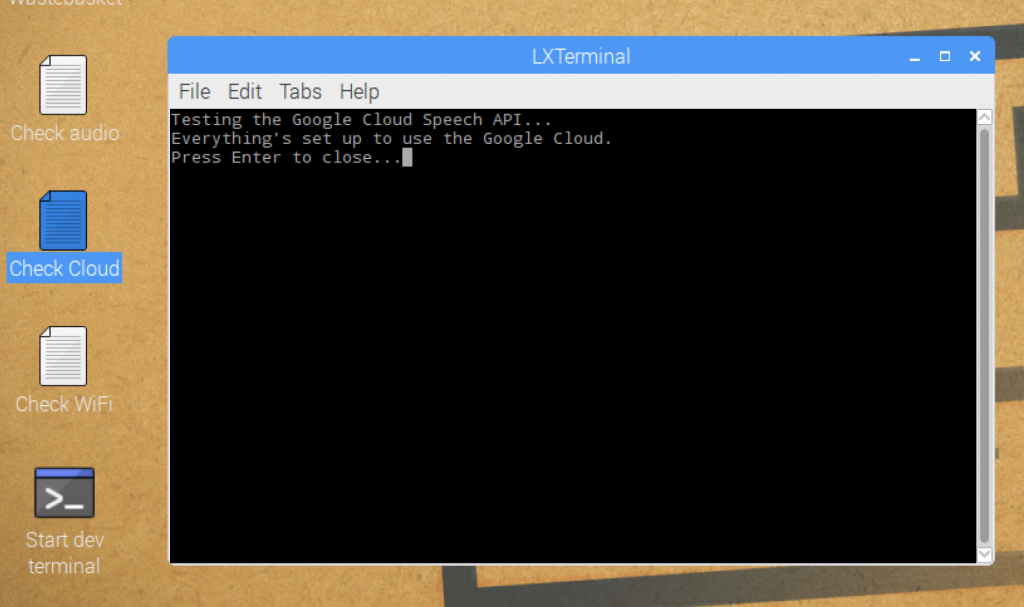
Now its all set up to use the cloud speach API we are good to start playing.
First thing is to change the default API to use the cloud speech .. edit the
/home/pi/.config/voice-recognizer.ini
ensure that the cloud-speech = true line is uncommented
# Uncomment to enable the Cloud Speech API for local commands.
cloud-speech = true
Now we are all set to use local commands and not the google assistant.
Firstly I wanted to make sure I could get a sound to play when I pressed the button, in the /home/pi/voice-recognizer-raspi/src directory I created a new file and called it raspi-audio-button.py
#!/usr/bin/env python

import vlc

from time import sleep

import RPi.GPIO as GPIO

GPIO.setmode(GPIO.BCM)
GPIO.setup(23, GPIO.IN)

while True:
    if (GPIO.input(23) == False):
        p=vlc.MediaPlayer('file:///home/pi/Downloads/StitchSounds/hi.mp3')
        p.play()

    sleep(0.1);
This basically tells the AIY kit to play the hi sound when I press the button. After a bit of a fiddle to get vlc working (but that was my lack of skills) it works great .. I run the script from the src directory using the “dev terminal” on the desktop (which in turn is just another script /home/pi/bin/voice-recognizer-shell.sh) and it works ..
I press the button and the box says Hi in Stitch’s voice 🙂
Awesome .. so lets move on to actually creating the code to get Stitch to talk.
Edit the action.py which lives in /home/pi/voice-recognizer-raspi/src
There are 2 chunks of code we needed to add ..
a class and a set of voice commands
The Class
We took the code from the RepeatAfterMe class and editied it .. I couldn’t have done this piece without my good friend Tim Clark who managed to work out what we needed to do to.
RepeatAfterMe Example
# Example: Repeat after me
# ========================
#
# This example will repeat what the user said. It shows how you can access what
# the user said, and change what you do or how you respond.

class RepeatAfterMe(object):

"""Repeats the user's command."""

def __init__(self, say, keyword):
 self.say = say
 self.keyword = keyword

def run(self, voice_command):
 # The command still has the 'repeat after me' keyword, so we need to
 # remove it before saying whatever is left.
 to_repeat = voice_command.replace(self.keyword, '', 1)
 self.say(to_repeat)
Stich Says Class
We have created the class below if the keyword = a certain word spoken the coresponding mp3 is played using vlc player
# STITCH : Classes
# ========================
#
# Classes to make Stitch talk are here
#

class StitchSays(object):
    """Plays a Stich sound file based on the user's command."""

    def __init__(self, keyword):
        self.keyword = keyword


    def run(self, voice_command):
        keyword = self.keyword
        if keyword == 'Thanks':
            soundmp3 = "file:///home/pi/Downloads/StitchSounds/thankyou.mp3"
        elif keyword == 'Laugh':
            soundmp3 = "file:///home/pi/Downloads/StitchSounds/laugh.mp3"
        elif keyword == 'Nutty':
            soundmp3 = "file:///home/pi/Downloads/StitchSounds/nutty.mp3"
        elif keyword == 'No':
            soundmp3 = "file:///home/pi/Downloads/StitchSounds/noTalk.mp3"
        elif keyword == 'Sing':
            soundmp3 = "file:///home/pi/Downloads/StitchSounds/sing.mp3"
        elif keyword == 'Behind':
            soundmp3 = "file:///home/pi/Downloads/StitchSounds/ohana.mp3"
        elif keyword == 'With':
            soundmp3 = "file:///home/pi/Downloads/StitchSounds/withFamily.mp3"
        elif keyword == 'Love':
            soundmp3 = "file:///home/pi/Downloads/StitchSounds/loveyou.mp3"
        elif keyword == 'Name':
            soundmp3 = "file:///home/pi/Downloads/StitchSounds/nameStitch.mp3"

        p = vlc.MediaPlayer(soundmp3)
        p.play()
Once we have a class defined the keywords must be added. Again we used repeat after me as an example
    actor.add_keyword(_('repeat after me'),
                      RepeatAfterMe(say, _('repeat after me')))
We add the word I wll speak, then the class and keyword
For example I say "Thanks" and the thanks mp3 is played

    # =========================================
    # STITCH! voice commands here.
    # =========================================

    actor.add_keyword(_('Thanks'), StitchSays(_('Thanks')))
    actor.add_keyword(_('Giggle'), StitchSays(_('Laugh')))
    actor.add_keyword(_('Nutty'), StitchSays(_('Nutty')))
    actor.add_keyword(_('No'), StitchSays(_('No')))
    actor.add_keyword(_('Sing'), StitchSays(_('Sing')))
    actor.add_keyword(_('Oh'), StitchSays(_('Behind')))
    actor.add_keyword(_('Family'), StitchSays(_('With')))
    actor.add_keyword(_('Love'), StitchSays(_('Love')))
    actor.add_keyword(_('Name'), StitchSays(_('Name')))
This is probably not the most elegant way to do this .. but it WORKS ..
I was SO pleased that we managed to get this far ..
The issue now is that if the Pi can’t understand what i say .. it throws an error and speaks in the robot voice .. that is the next thing to fix – we will do that in part 4 of #projecttalkie