
Before I could attempt to get creative with the code examples – we first had to build the kit and make sure it worked with the things and code that was provided.
I have used the images from the aiyprojects.withgoogle.com/voice page. They are great pictures and show step by step how to put things together, I may have forgotten to take step by step pics as we built it too.
Prep the SD Card
With the voice SD image we downloaded in pt1 – use etcher to flash the SD card and get it ready for the Pi.
The voice image is a version of Rasbrian with some added extra’s to help with the project.
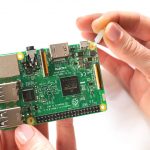
Second Step – Build the hardware
The hardware was pretty straight forward … following the instructions on the AIY site


Once it was all assembled put the prepped SD card in the pi .. its too difficult to wrangle it in once in the box.
Step three – Build the box
This bit is a bit like origami with cardboard .. I may have got a bit sweary at this point .. but if you follow the picture guide and work out what way up things need to go you are good .. it took longer to build the box than add the HAT to the Pi …
Step four – Put the Pi Hat in the box

Took a bit of sliding and making sure the cables weren’t tangled
Make sure all the ports line up as they should so you can plug the pi in
Now to fit the arcade button, switch, light and wire it up .. Then line the mic up and tape it on the inside flap of the box.


As if by magic .. it is done .. we have a BOX of AIY fun to start playing with

Plug it in .. and update it
Plug you pi in and fire it up. You need a USB keyboard and mouse and HDMI connection to a monitor ot TV. I had an issue with getting some of the built in code to run – this was resolved by updating the pi. Boot it up and connect it to the wireless network and then update.
sudo apt-get update

sudo apt-get upgrade
Once your pi has updated you should be good. You have a lovely desktop environment with all the example code ready installed to play with

Verify its working

Let’s check the audio first – on the desktop there is a Check Audio file. Double click it to run. the speaker test will play first, you are then prompted to speak so it can test the playback.

Here is a short video of it working.
There is also a check wifi file .. but we know the wifi is good as we have updated already .. but if you REALLY want to test it .. go for it 🙂


We are ALL set and ready to go .. next step is playing with the example code .. come back for part 3 of #projecttalkie and I will show you what I did next