PonyCam update

PonyCam update

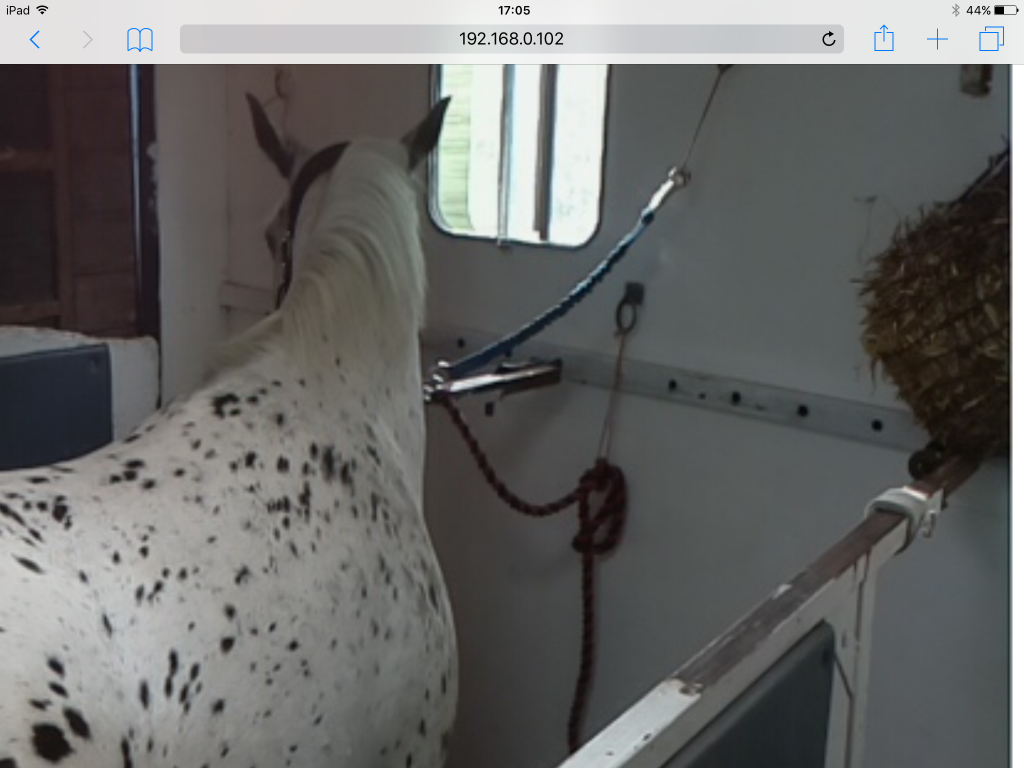
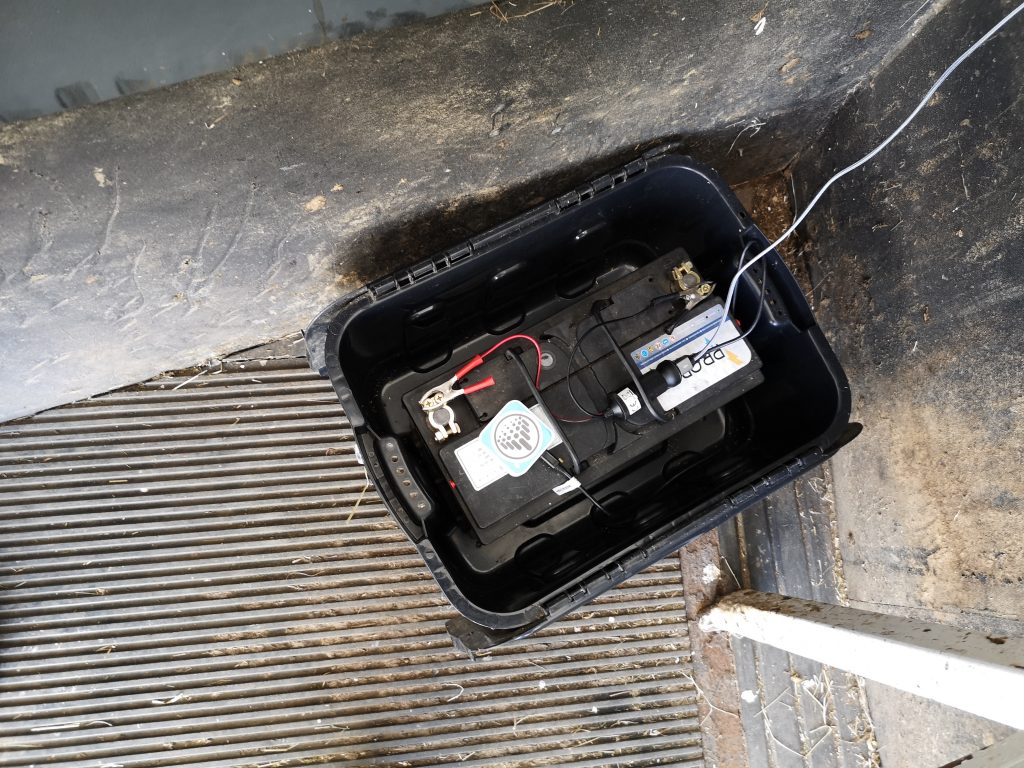
It is installed and running off of a 12v leisure battery – there is a cigarette lighter adapter with 2 USB ports running power to the Nano Router and the Pi

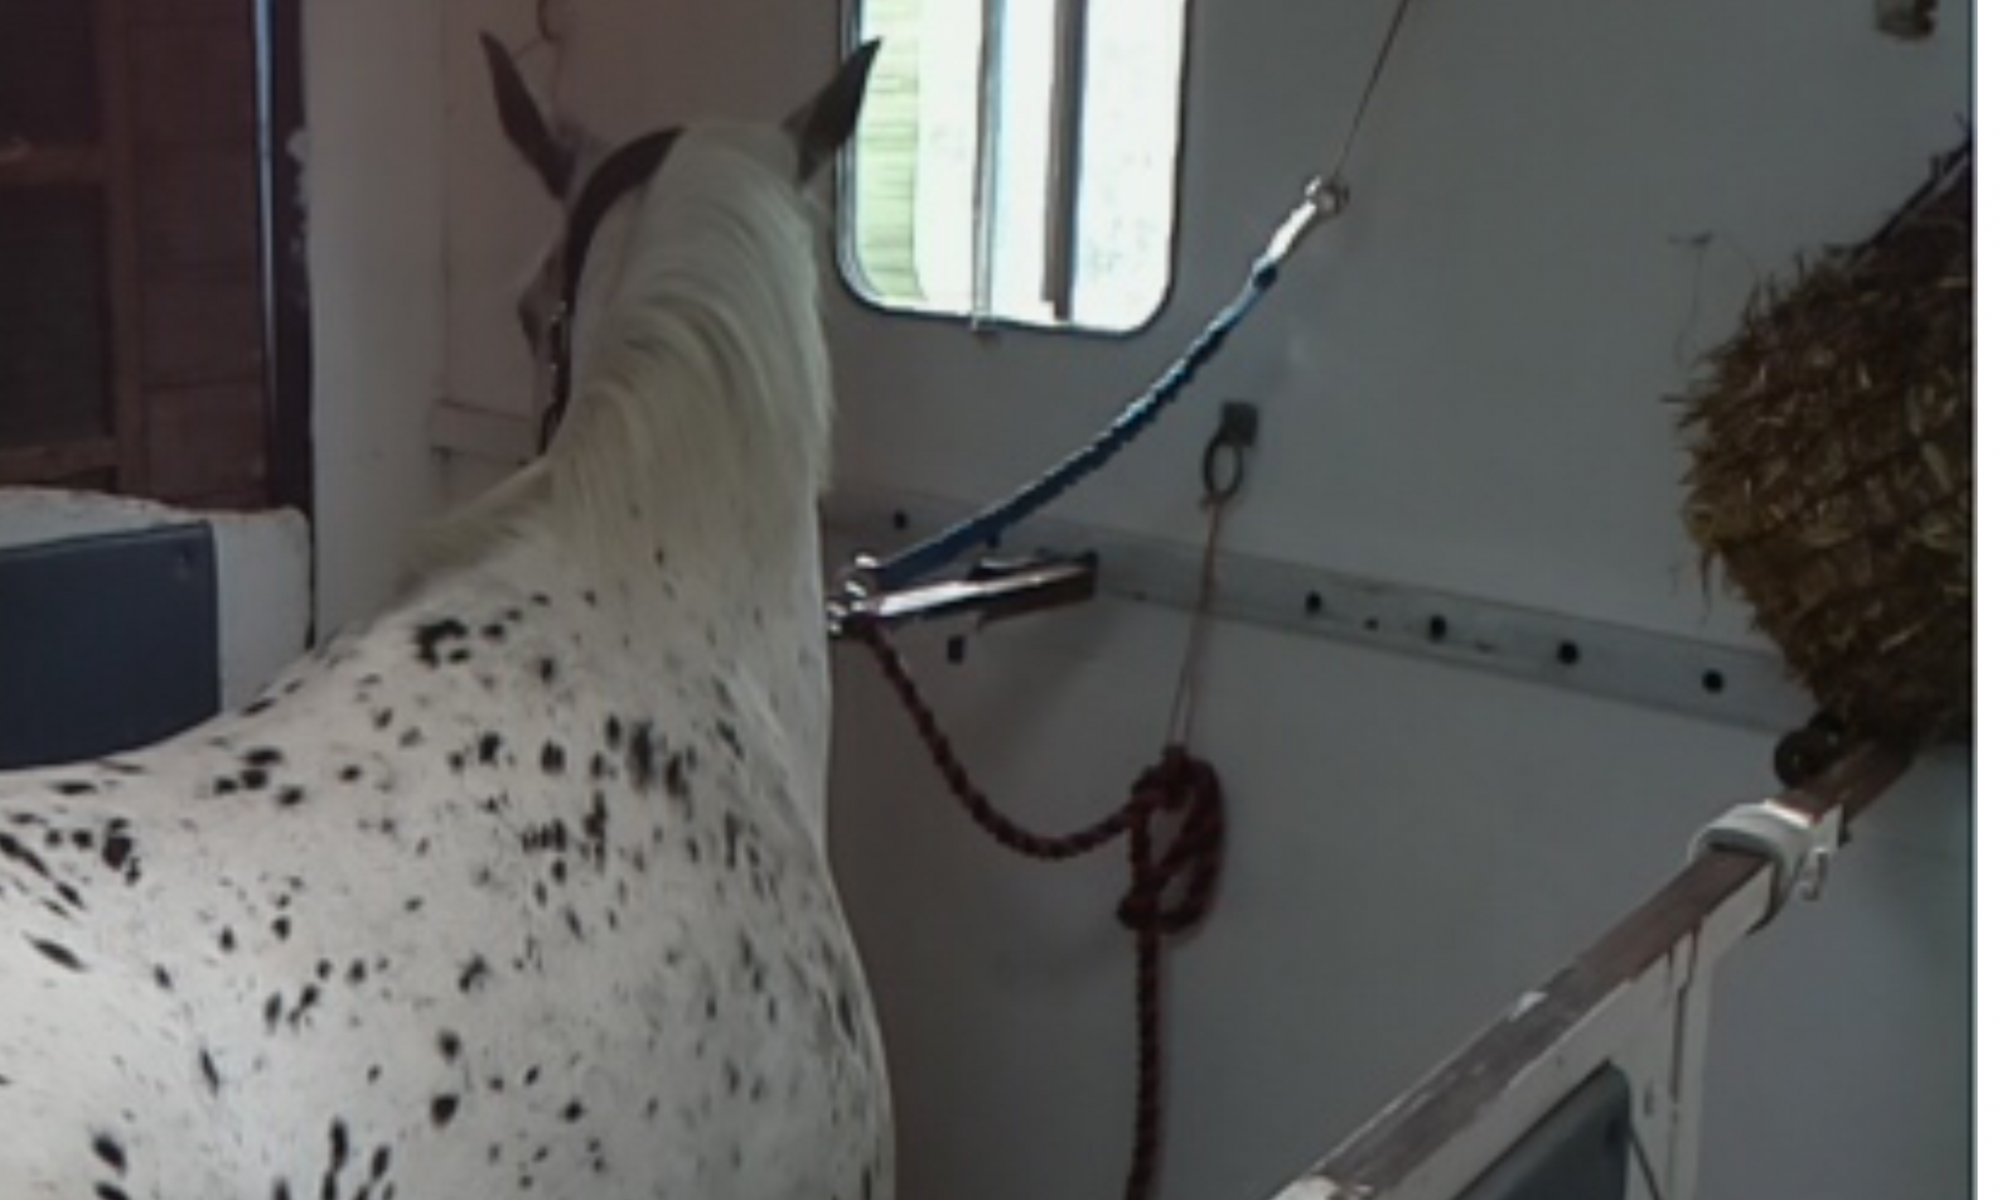
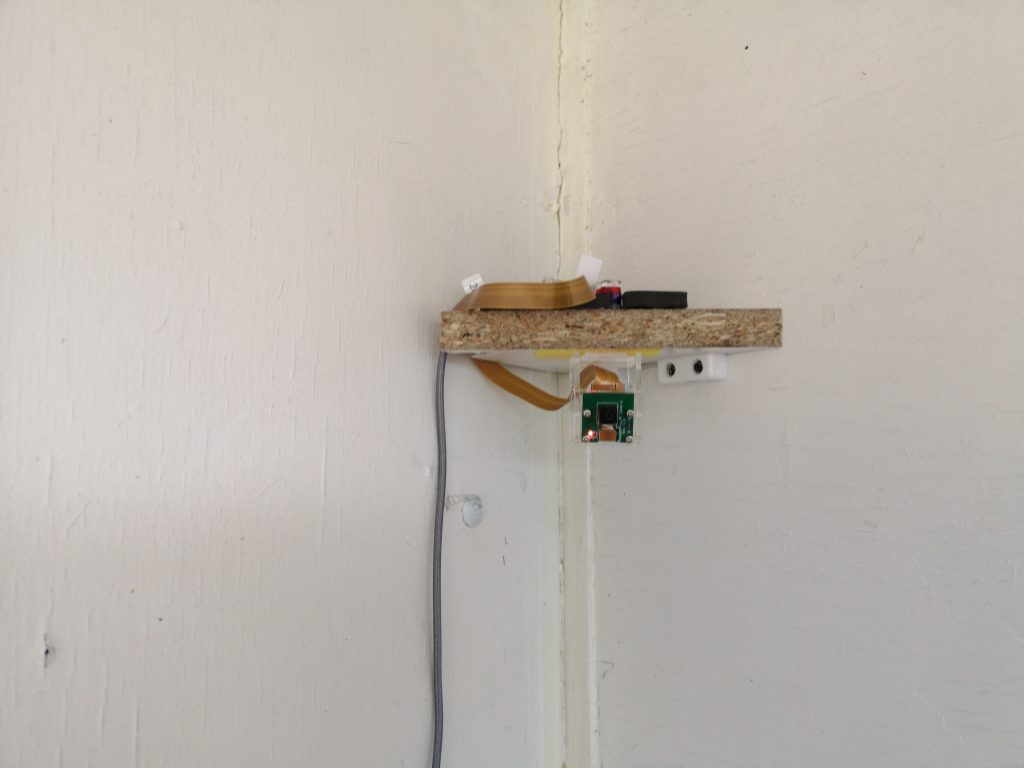
The Pi is mounted on a shelf – in a little cradle made from EVA foam to stop it sliding about. The camera is mounted with some velcro under the shelf which can be angled as required.

We used it for the first time yesterday as I took Luna out to a horse show and it worked beautifully. Streaming the image to the iPad worked really well. The picture was good and the battery appears to be lasting forever which is also good.

So all in all I am over the moon with it – I will look to improve it, but so far so good. I will post an update with any improvements we make 🙂


PonyCam or Raspberry Pi surveillance system

This was a super simple and not very expensive project. I needed a way to watch the ponies in the horse box whilst we are travelling. Obviously you can buy systems that do this, but they are expensive – starting at about £150 for a low end one .. and they can get as expensive as £600.  I was convinced that I could make something way cheeper than that with a Raspberry Pi .. so I googled.

What you will need to make a surveillance system:

Something to use as a screen – an old phone, tablet as long as it can connect via wi-fi and it has a browser that will work fine.


Raspberry Pi Zero W – which you can buy from the awesome PiMoroni or PiHut for less than £10

Link to Pi Zero – Pimoroni
Link to PiZero – PiHut


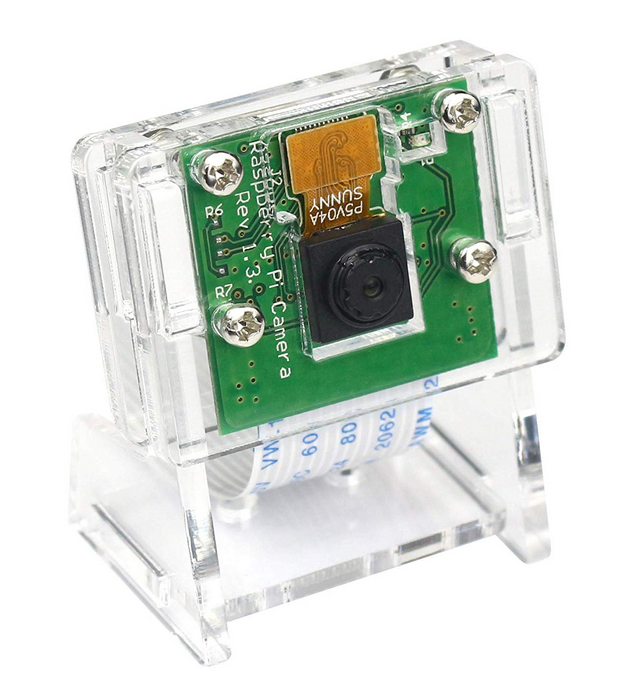
Pi Camera – I have this one from amazon £13 comes with a handy camera holder
Amazon Link to PiCamera


Wireless nano router – again from amazon for less than £20, this allows the Pi to talk to the device to show the streaming video
Amazon Link to Nano Router


Basic Steps

Setting up the Nano Router

Super simple. You normally fire it up and browse to its web interface and login to set it up. Most have very simple guides to set it up and to be honest as its not connecting to anything other than the RaspberryPi and an old phone default settings are fine.

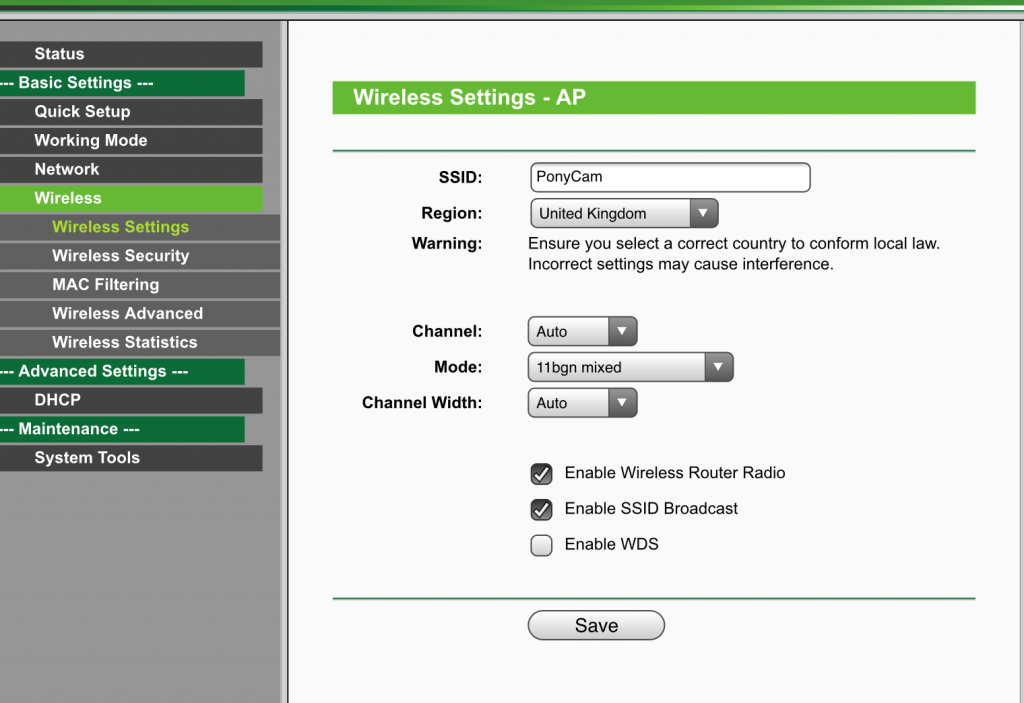
I have changed the wireless settings on mine to call it PonyCam and gave it a sensible password.


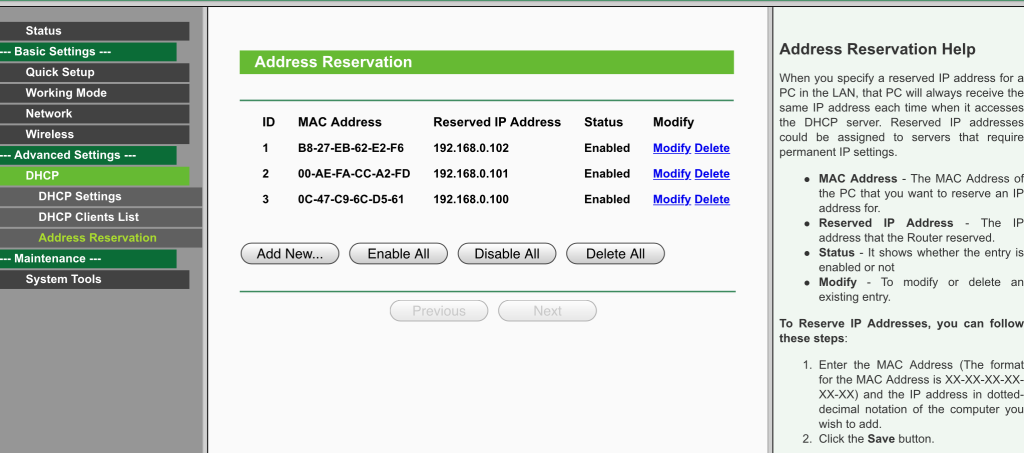
The only other things I have changed is making the IP address of the Pi and phone sticky so they keep the same ones


Setting up the Pi

  • Set up the Pi as normal – the lasest version of raspbian and patch it – you can get info about installing if you have never done it before here
  • Build the camera housing .. it is a bit fiddly but takes about 5 mins.
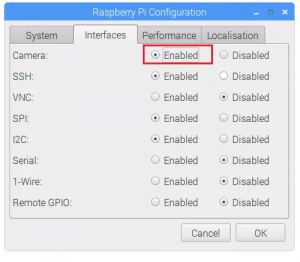
  • Enable the camera module – Either from the UI


Or the terminal –

sudo raspi-config

and select the Interfacing Options > Enable/Disable the RaspberryPi camera

once complete reboot

  • Shut the Pi down and plug the camera in
  • Turn it back on
  • Attach the Pi to the new wireless network – PonyCam in my case
  • Get the IP of your pi – from a terminal
ifconfig

The IP of my Pi is 192.168.0.102 and I have set it in the router to always assign that IP.

nano rpi_camera_surveillance_system.py
  • Run the script by running the following command
python3 rpi_camera_surveillance_system.py
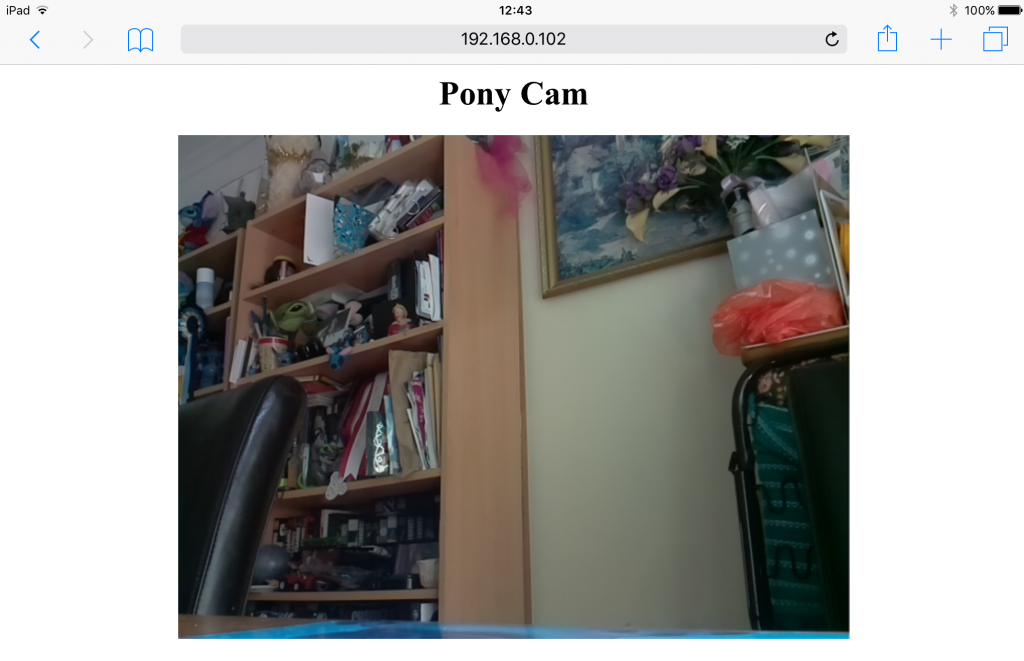
  • Test the script from the Pi by going to the following url:
    http://ipaddressofpi:8000
    i.e – http://192.168.0.102:8000

A lovely image of the back of a chair, but it works 🙂

Start up and shutdown

As I am going to want to use this ‘headless’ as a plug and go solution I wanted the script to run on Pi boot and have a way to shut the Pi down nicely rather than just pulling the plug.

Firstly configure VNC

  • If you don’t already have one, create a free VNC account
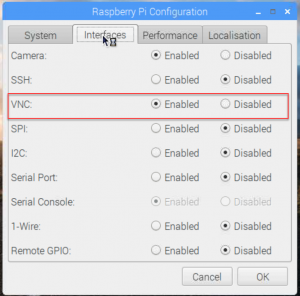
  • Enable the VNC from the UI under Preferences > Raspberry Pi Configuration

  • This will open up the config dialog, enable VNC
  • Once rebooted you can configure the Pi – by default you log in with the standard Pi username and password.
  • Install VNC viewer on the phone or tablet and configure it – make sure it is connected to the same wifi as the Pi.
  • You can now connecto to the Pi using it’s local IP address and the Pi username and password.
  • This will allow you to shut the pi down and command it from the phone or tablet – simples

Add the Camera script to the startup

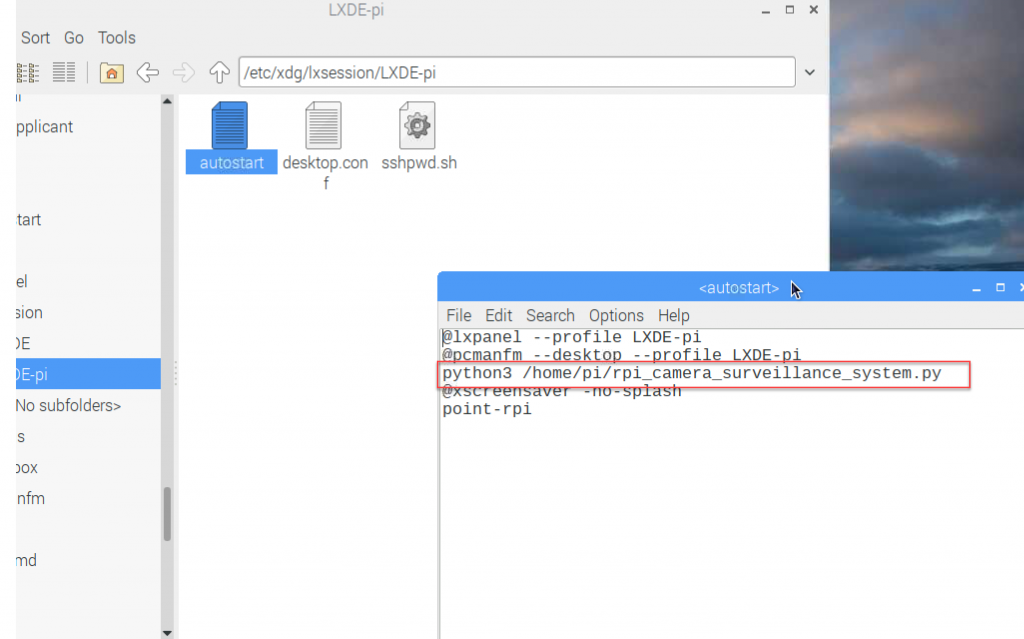
We now have to add the camera script to the autostart file

  • Run the command
sudo nano /etc/xdg/lxsession/LXDE-pi/autostart 
  • Once the file has opened use the arrow keys to navigate to the end of the 2nd line and press enter. Add the path of the script on to line 3 just above the screen saver.

  • Save and close the file and restart the Pi. The camera script will start when the Pi boots.

And there you go .. all done .. I will post an update over the next week with it all installed and working.

The idea for this was taken from the randomnerdtutorials site which has loads of cool Pi camera projects. Use this link here to see the video streaming posts tutorial and thanks to my hubby Nathan for doing some of the grunt work as I was busy working – he is now full of ideas for projects with Pi cameras 🙂

Let’s get Stitch talking – Project #talkie pt 3

So after building the kit and testing that it worked .. It was time to get creative ..

there are some examples on what to do code wise on the AIY kit voice site

First I had to go through the billing set up and processes. Even though the code is free, and the kit is free and they give you $300 worth of credit – you still have to set up billing. It was a pain as I already had a cloud dev account for some of the APIs I use on bit of my sites, but eventually I worked it out – I may have cussed a little. Once that was sorted and I created the credentials I needed I could copy those to the right place and I was good to start experimenting.

There is even a quick script that checks it all for you .. if there are any errors – you have missed a step.
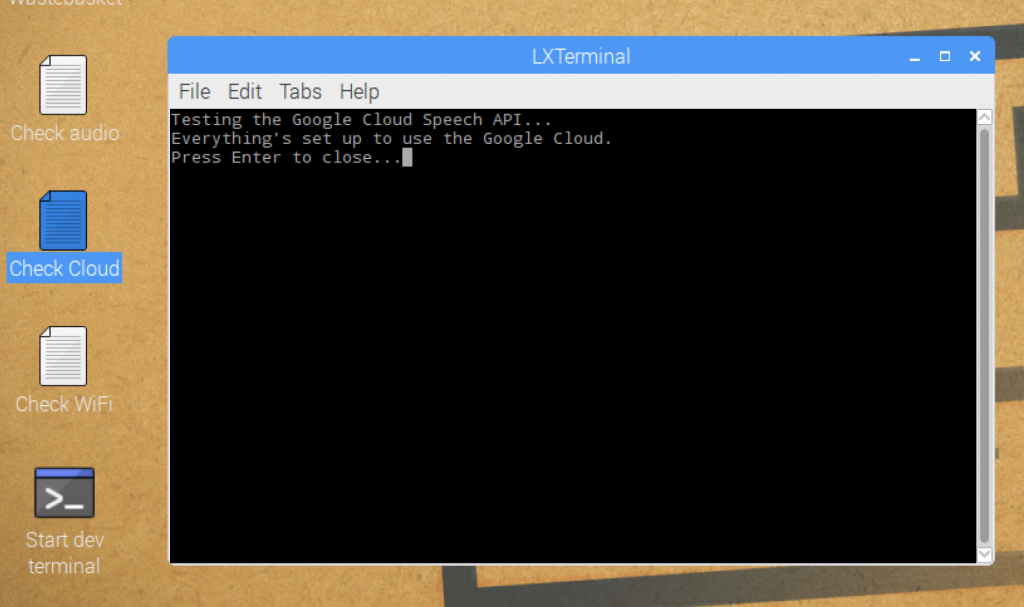


Now its all set up to use the cloud speach API we are good to start playing.

First thing is to change the default API to use the cloud speech .. edit the

/home/pi/.config/voice-recognizer.ini

ensure that the cloud-speech = true line is uncommented

# Uncomment to enable the Cloud Speech API for local commands.
cloud-speech = true

Now we are all set to use local commands and not the google assistant.

Firstly I wanted to make sure I could get a sound to play when I pressed the button, in the /home/pi/voice-recognizer-raspi/src directory I created a new file and called it raspi-audio-button.py

#!/usr/bin/env python

import vlc

from time import sleep
 
import RPi.GPIO as GPIO
 
GPIO.setmode(GPIO.BCM)
GPIO.setup(23, GPIO.IN)

while True:
    if (GPIO.input(23) == False):
        p=vlc.MediaPlayer('file:///home/pi/Downloads/StitchSounds/hi.mp3')
        p.play()

    sleep(0.1);

This basically tells the AIY kit to play the hi sound when I press the button. After a bit of a fiddle to get vlc working (but that was my lack of skills) it works great .. I run the script from the src directory using the “dev terminal” on the desktop (which in turn is just another script /home/pi/bin/voice-recognizer-shell.sh) and it works ..

I press the button and the box says Hi in Stitch’s voice 🙂


Awesome ..  so lets move on to actually creating the code to get Stitch to talk.


Edit the action.py which lives in /home/pi/voice-recognizer-raspi/src

There are 2 chunks of code we needed to add ..

a class and a set of voice commands


The Class

We took the code from the RepeatAfterMe class and editied it .. I couldn’t have done this piece without my good friend Tim Clark who managed to work out what we needed to do to.


RepeatAfterMe Example

# Example: Repeat after me
# ========================
#
# This example will repeat what the user said. It shows how you can access what
# the user said, and change what you do or how you respond.

class RepeatAfterMe(object):

"""Repeats the user's command."""

def __init__(self, say, keyword):
 self.say = say
 self.keyword = keyword

def run(self, voice_command):
 # The command still has the 'repeat after me' keyword, so we need to
 # remove it before saying whatever is left.
 to_repeat = voice_command.replace(self.keyword, '', 1)
 self.say(to_repeat)


Stich Says Class

We have created the class below if the keyword = a certain word spoken the coresponding mp3 is played using vlc player


# STITCH : Classes
# ========================
#
# Classes to make Stitch talk are here
# 

class StitchSays(object):
    """Plays a Stich sound file based on the user's command."""

    def __init__(self, keyword):
        self.keyword = keyword


    def run(self, voice_command):
        keyword = self.keyword
        if keyword == 'Thanks':
            soundmp3 = "file:///home/pi/Downloads/StitchSounds/thankyou.mp3"
        elif keyword == 'Laugh':
            soundmp3 = "file:///home/pi/Downloads/StitchSounds/laugh.mp3"
        elif keyword == 'Nutty':
            soundmp3 = "file:///home/pi/Downloads/StitchSounds/nutty.mp3"
        elif keyword == 'No':
            soundmp3 = "file:///home/pi/Downloads/StitchSounds/noTalk.mp3"
        elif keyword == 'Sing':
            soundmp3 = "file:///home/pi/Downloads/StitchSounds/sing.mp3"
        elif keyword == 'Behind':
            soundmp3 = "file:///home/pi/Downloads/StitchSounds/ohana.mp3"
        elif keyword == 'With':
            soundmp3 = "file:///home/pi/Downloads/StitchSounds/withFamily.mp3"
        elif keyword == 'Love':
            soundmp3 = "file:///home/pi/Downloads/StitchSounds/loveyou.mp3"
        elif keyword == 'Name':
            soundmp3 = "file:///home/pi/Downloads/StitchSounds/nameStitch.mp3"

        p = vlc.MediaPlayer(soundmp3)
        p.play()


Once we have a class defined the keywords must be added. Again we used repeat after me as an example

    actor.add_keyword(_('repeat after me'),
                      RepeatAfterMe(say, _('repeat after me')))


We add the word I wll speak, then the class and keyword

For example I say "Thanks" and the thanks mp3 is played

    # =========================================
    # STITCH! voice commands here.
    # =========================================

    actor.add_keyword(_('Thanks'), StitchSays(_('Thanks')))
    actor.add_keyword(_('Giggle'), StitchSays(_('Laugh')))
    actor.add_keyword(_('Nutty'), StitchSays(_('Nutty')))
    actor.add_keyword(_('No'), StitchSays(_('No')))
    actor.add_keyword(_('Sing'), StitchSays(_('Sing')))
    actor.add_keyword(_('Oh'), StitchSays(_('Behind')))
    actor.add_keyword(_('Family'), StitchSays(_('With')))
    actor.add_keyword(_('Love'), StitchSays(_('Love')))
    actor.add_keyword(_('Name'), StitchSays(_('Name')))


This is probably not the most elegant way to do this .. but it WORKS ..

I was SO pleased that we managed to get this far ..

The issue now is that if the Pi can’t understand what i say .. it throws an error and speaks in the robot voice .. that is the next thing to fix – we will do that in part 4 of #projecttalkie
 

Building the AIY – Project #talkie pt2

Before I could attempt to get creative with the code examples – we first had to build the kit and make sure it worked with the things and code that was provided.

I have used the images from the aiyprojects.withgoogle.com/voice page. They are great pictures and show step by step how to put things together, I may have forgotten to take step by step pics as we built it too.

Prep the SD Card

With the voice SD image we downloaded in pt1 – use etcher to flash the SD card and get it ready for the Pi.

The voice image is a version of Rasbrian with some added extra’s to help with the project.


Second Step – Build the hardware

The hardware was pretty straight forward … following the instructions on the AIY site


Once it was all assembled put the prepped SD card in the pi .. its too difficult to wrangle it in once in the box.

Step three – Build the box

This bit is a bit like origami with cardboard ..  I may have got a bit sweary at this point .. but if you follow the picture guide and work out what way up things need to go you are good .. it took longer to build the box than add the HAT to the Pi …

Step four – Put the Pi Hat in the box


Took a bit of sliding and making sure the cables weren’t tangled

Make sure all the ports line up as they should so you can plug the pi in


Now to fit the arcade button, switch, light and wire it up .. Then line the mic up and tape it on the inside flap of the box.


As if by magic .. it is done .. we have a BOX of AIY fun to start playing with

Plug it in .. and update it

Plug you pi in and fire it up. You need a USB keyboard and mouse and HDMI connection to a monitor ot TV. I had an issue with getting some of the built in code to run – this was resolved by updating the pi. Boot it up and connect it to the wireless network and then update.

sudo apt-get update

sudo apt-get upgrade

Once your pi has updated you should be good. You have a lovely desktop environment with all the example code ready installed to play with


Verify its working

Let’s check the audio first – on the desktop there is a Check Audio file. Double click it to run. the speaker test will play first, you are then prompted to speak so it can test the playback.


Here is a short video of it working.


There is also a check wifi file .. but we know the wifi is good as we have updated already .. but if you REALLY want to test it .. go for it 🙂


We are ALL set and ready to go .. next step is playing with the example code .. come back for part 3 of #projecttalkie and I will show you what I did next

Project #talkie pt1 – getting to grips with a rasberrypi

What’s all this #talkie stuff about then?

So I have been posting stuff on facebook twitter and instragram with the #projecttalkie or #talkie hash tag ..


Most of you know that I costume .. and as well as my love for star wars (and my mandalorian costume), I also LOVE to costume as Stitch …

You can see me here as my favourite fluffy blue alien experiment (626) with my good pal and all around lovely Captain America friend Mr James Budd.

Again most of you know that i am a HUGE supporter and raise money for an amazing cause – Feel the Force Day. FTFD events are for guests with disabilities – physical and mental – and we have a lot of guests that are visually impared. Stitch is great for touch as he is big, blue and fluffy – but I have been desperate to get him to talk and to allow him to interact with the FTFD guests.

It would be super cool for other events to have Stitch able to interact with people as kids and adults LOVE him 🙂

The traditional sound glove method wouldn’t work as his hands are big and bulky and I would be limited to 4 sounds.. so thinking cap was well and truly on …


Fast forward to sitting on the ferry on the way to the amazing Engage user group. My good buddy, work colleague, fellow IBM Champion and all around lovely chap Mr Tim Clark. He told me that Issue 57 of the MagPi (the best rasberrypi magazine) came with a Goolge powered AIY kit – which is a handy little voice had and the code to enable the use of a handy little voice recognizer you can connect to the Google Assistant. All in a handy little cardboard cube, powered by a Raspberry Pi.

Could I use that? I wondered, to get Stitch to talk .. out game Tim’s version of the mag and we had a looksy through it .. HELL YEAH .. we both decided it was worth a go .. all I needed extra was a PI3 – which I wanted to get one for tinkering with anyways …

How much for this amazing voice kit that came with the MagPi? A bargain at £5.99 – yup a whole kit to get voice recognizing to work in a similar way to alexa and siri but WAY better as i can customize it – FOR LESS THAN 6 QUID !!!! Needless to say I had to have one .. and the plea went out on social media to acquire one whilst we were in Belgium doing the day job.

No joy whilst I was away, as it was selling out as quickly as the mag was hitting the shelves. To put it blunty they were “as rare as rocking horse poo” –  but I did manage to grab the last TWO copies in my local Sainsburys store on my way back from Belgium. I did feel slightly guilty taking the last copies BUT Stitch needs to talk and Nathan wanted to give the home made alexa project a go and this kit is just what he needs.

So I had my kit, but no pi – so off to pimoroni to grab me a PI .. being new to the Pi, I opted for the starter kit so I would have everything I needed. The AIY kit states it needs the Pi3, but a few people have managed to get it working with a pi zero w – which for my Stitch project would be better as it will need to run headless, run off a usb power pack (like you use for charging your phone), and basically sit in Stitch’s head. Let’s not run before I can walk I thought so all my testing so far has been with the Pi3.


What I have used (so far)


A shiny new RasberryPi 3b from the lovely people at Pimoroni


A copy of MagPi 57


The fab AIY kit that comes with MagPi 75


Micro SD card which you need to load the voice kit sd image.


Etcher.io a really handy tool for making sd cards bootable with the image of your choice

So now everything is assembled we can get down to the good bit – building the kit and editing the code – dangerous for an admin to have a go at coding I know .. visit back soon for part 2 of #projecttalkie 🙂

Buy Me A Coffee