Let’s get Stitch talking – Project #talkie pt 3

So after building the kit and testing that it worked .. It was time to get creative ..

there are some examples on what to do code wise on the AIY kit voice site

First I had to go through the billing set up and processes. Even though the code is free, and the kit is free and they give you $300 worth of credit – you still have to set up billing. It was a pain as I already had a cloud dev account for some of the APIs I use on bit of my sites, but eventually I worked it out – I may have cussed a little. Once that was sorted and I created the credentials I needed I could copy those to the right place and I was good to start experimenting.

There is even a quick script that checks it all for you .. if there are any errors – you have missed a step.
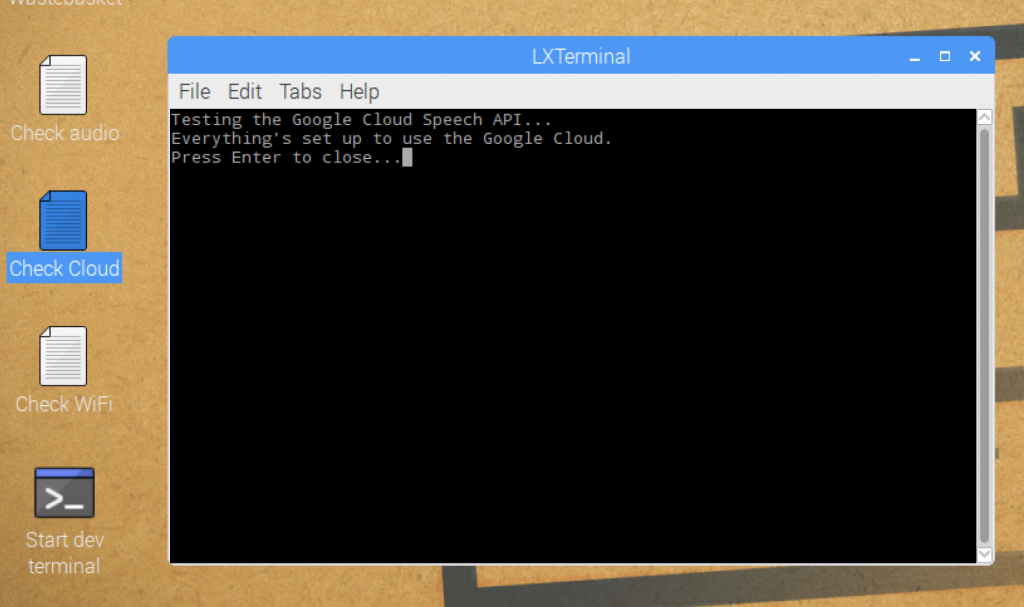


Now its all set up to use the cloud speach API we are good to start playing.

First thing is to change the default API to use the cloud speech .. edit the

/home/pi/.config/voice-recognizer.ini

ensure that the cloud-speech = true line is uncommented

# Uncomment to enable the Cloud Speech API for local commands.
cloud-speech = true

Now we are all set to use local commands and not the google assistant.

Firstly I wanted to make sure I could get a sound to play when I pressed the button, in the /home/pi/voice-recognizer-raspi/src directory I created a new file and called it raspi-audio-button.py

#!/usr/bin/env python

import vlc

from time import sleep
 
import RPi.GPIO as GPIO
 
GPIO.setmode(GPIO.BCM)
GPIO.setup(23, GPIO.IN)

while True:
    if (GPIO.input(23) == False):
        p=vlc.MediaPlayer('file:///home/pi/Downloads/StitchSounds/hi.mp3')
        p.play()

    sleep(0.1);

This basically tells the AIY kit to play the hi sound when I press the button. After a bit of a fiddle to get vlc working (but that was my lack of skills) it works great .. I run the script from the src directory using the “dev terminal” on the desktop (which in turn is just another script /home/pi/bin/voice-recognizer-shell.sh) and it works ..

I press the button and the box says Hi in Stitch’s voice 🙂


Awesome ..  so lets move on to actually creating the code to get Stitch to talk.


Edit the action.py which lives in /home/pi/voice-recognizer-raspi/src

There are 2 chunks of code we needed to add ..

a class and a set of voice commands


The Class

We took the code from the RepeatAfterMe class and editied it .. I couldn’t have done this piece without my good friend Tim Clark who managed to work out what we needed to do to.


RepeatAfterMe Example

# Example: Repeat after me
# ========================
#
# This example will repeat what the user said. It shows how you can access what
# the user said, and change what you do or how you respond.

class RepeatAfterMe(object):

"""Repeats the user's command."""

def __init__(self, say, keyword):
 self.say = say
 self.keyword = keyword

def run(self, voice_command):
 # The command still has the 'repeat after me' keyword, so we need to
 # remove it before saying whatever is left.
 to_repeat = voice_command.replace(self.keyword, '', 1)
 self.say(to_repeat)


Stich Says Class

We have created the class below if the keyword = a certain word spoken the coresponding mp3 is played using vlc player


# STITCH : Classes
# ========================
#
# Classes to make Stitch talk are here
# 

class StitchSays(object):
    """Plays a Stich sound file based on the user's command."""

    def __init__(self, keyword):
        self.keyword = keyword


    def run(self, voice_command):
        keyword = self.keyword
        if keyword == 'Thanks':
            soundmp3 = "file:///home/pi/Downloads/StitchSounds/thankyou.mp3"
        elif keyword == 'Laugh':
            soundmp3 = "file:///home/pi/Downloads/StitchSounds/laugh.mp3"
        elif keyword == 'Nutty':
            soundmp3 = "file:///home/pi/Downloads/StitchSounds/nutty.mp3"
        elif keyword == 'No':
            soundmp3 = "file:///home/pi/Downloads/StitchSounds/noTalk.mp3"
        elif keyword == 'Sing':
            soundmp3 = "file:///home/pi/Downloads/StitchSounds/sing.mp3"
        elif keyword == 'Behind':
            soundmp3 = "file:///home/pi/Downloads/StitchSounds/ohana.mp3"
        elif keyword == 'With':
            soundmp3 = "file:///home/pi/Downloads/StitchSounds/withFamily.mp3"
        elif keyword == 'Love':
            soundmp3 = "file:///home/pi/Downloads/StitchSounds/loveyou.mp3"
        elif keyword == 'Name':
            soundmp3 = "file:///home/pi/Downloads/StitchSounds/nameStitch.mp3"

        p = vlc.MediaPlayer(soundmp3)
        p.play()


Once we have a class defined the keywords must be added. Again we used repeat after me as an example

    actor.add_keyword(_('repeat after me'),
                      RepeatAfterMe(say, _('repeat after me')))


We add the word I wll speak, then the class and keyword

For example I say "Thanks" and the thanks mp3 is played

    # =========================================
    # STITCH! voice commands here.
    # =========================================

    actor.add_keyword(_('Thanks'), StitchSays(_('Thanks')))
    actor.add_keyword(_('Giggle'), StitchSays(_('Laugh')))
    actor.add_keyword(_('Nutty'), StitchSays(_('Nutty')))
    actor.add_keyword(_('No'), StitchSays(_('No')))
    actor.add_keyword(_('Sing'), StitchSays(_('Sing')))
    actor.add_keyword(_('Oh'), StitchSays(_('Behind')))
    actor.add_keyword(_('Family'), StitchSays(_('With')))
    actor.add_keyword(_('Love'), StitchSays(_('Love')))
    actor.add_keyword(_('Name'), StitchSays(_('Name')))


This is probably not the most elegant way to do this .. but it WORKS ..

I was SO pleased that we managed to get this far ..

The issue now is that if the Pi can’t understand what i say .. it throws an error and speaks in the robot voice .. that is the next thing to fix – we will do that in part 4 of #projecttalkie

 

Building the AIY – Project #talkie pt2

Before I could attempt to get creative with the code examples – we first had to build the kit and make sure it worked with the things and code that was provided.

I have used the images from the aiyprojects.withgoogle.com/voice page. They are great pictures and show step by step how to put things together, I may have forgotten to take step by step pics as we built it too.

Prep the SD Card

With the voice SD image we downloaded in pt1 – use etcher to flash the SD card and get it ready for the Pi.

The voice image is a version of Rasbrian with some added extra’s to help with the project.


Second Step – Build the hardware

The hardware was pretty straight forward … following the instructions on the AIY site


Once it was all assembled put the prepped SD card in the pi .. its too difficult to wrangle it in once in the box.

Step three – Build the box

This bit is a bit like origami with cardboard ..  I may have got a bit sweary at this point .. but if you follow the picture guide and work out what way up things need to go you are good .. it took longer to build the box than add the HAT to the Pi …

Step four – Put the Pi Hat in the box


Took a bit of sliding and making sure the cables weren’t tangled

Make sure all the ports line up as they should so you can plug the pi in


Now to fit the arcade button, switch, light and wire it up .. Then line the mic up and tape it on the inside flap of the box.


As if by magic .. it is done .. we have a BOX of AIY fun to start playing with

Plug it in .. and update it

Plug you pi in and fire it up. You need a USB keyboard and mouse and HDMI connection to a monitor ot TV. I had an issue with getting some of the built in code to run – this was resolved by updating the pi. Boot it up and connect it to the wireless network and then update.

sudo apt-get update

sudo apt-get upgrade

Once your pi has updated you should be good. You have a lovely desktop environment with all the example code ready installed to play with


Verify its working

Let’s check the audio first – on the desktop there is a Check Audio file. Double click it to run. the speaker test will play first, you are then prompted to speak so it can test the playback.


Here is a short video of it working.


There is also a check wifi file .. but we know the wifi is good as we have updated already .. but if you REALLY want to test it .. go for it 🙂


We are ALL set and ready to go .. next step is playing with the example code .. come back for part 3 of #projecttalkie and I will show you what I did next

Who knew my love for StarWars would win me a prize

On May the 4th (also known as StarWars day – you work it out) one of my good friends and former co worker (not sure how he put up sitting opposite me for 2 and a half years 🙂 ) Mr Dave Sheryn pinged me with an interesting link to a starwars costume competition ..

“That’ll be fun”, I thought, “will give it ago .. have a snowballs chance in hell of winning” – so I posted this pic of me

With the message

O well if we are showing off star wars costumes .. this is my mandalorian - made, painted & worn by me :D

Didn’t expect to hear a thing back ..

For those of you that know about my StarWars obsession – I spent about 2 years inbetween life, work, illness, getting married etc. to make my mando costume – it was a labour of love which I made and painted myself and its always in upgrade mode 🙂

Imagine my surprise when I recieved this tweet on Revenge of the 5th (that’s the 5th of may incase you were wondering) …

O M G was one of the nicer expletives that may have left my lips …. I NEVER win anything …

The prize is a Nerf Millenium Falcon and I can’t thank The Freaky Clown enough for this .. thanks again for picking me

It’s bloody amazing … I haven’t unboxed it yet as I am worried I will spend hours playing with it and not want to stop 🙂

I do have plans for it though .. I am going to lend it to Feel the Force Day for their touch table – and i really need to find it somewhere to live at home ..


Project #talkie pt1 – getting to grips with a rasberrypi

What’s all this #talkie stuff about then?

So I have been posting stuff on facebook twitter and instragram with the #projecttalkie or #talkie hash tag ..


Most of you know that I costume .. and as well as my love for star wars (and my mandalorian costume), I also LOVE to costume as Stitch …

You can see me here as my favourite fluffy blue alien experiment (626) with my good pal and all around lovely Captain America friend Mr James Budd.

Again most of you know that i am a HUGE supporter and raise money for an amazing cause – Feel the Force Day. FTFD events are for guests with disabilities – physical and mental – and we have a lot of guests that are visually impared. Stitch is great for touch as he is big, blue and fluffy – but I have been desperate to get him to talk and to allow him to interact with the FTFD guests.

It would be super cool for other events to have Stitch able to interact with people as kids and adults LOVE him 🙂

The traditional sound glove method wouldn’t work as his hands are big and bulky and I would be limited to 4 sounds.. so thinking cap was well and truly on …


Fast forward to sitting on the ferry on the way to the amazing Engage user group. My good buddy, work colleague, fellow IBM Champion and all around lovely chap Mr Tim Clark. He told me that Issue 57 of the MagPi (the best rasberrypi magazine) came with a Goolge powered AIY kit – which is a handy little voice had and the code to enable the use of a handy little voice recognizer you can connect to the Google Assistant. All in a handy little cardboard cube, powered by a Raspberry Pi.

Could I use that? I wondered, to get Stitch to talk .. out game Tim’s version of the mag and we had a looksy through it .. HELL YEAH .. we both decided it was worth a go .. all I needed extra was a PI3 – which I wanted to get one for tinkering with anyways …

How much for this amazing voice kit that came with the MagPi? A bargain at £5.99 – yup a whole kit to get voice recognizing to work in a similar way to alexa and siri but WAY better as i can customize it – FOR LESS THAN 6 QUID !!!! Needless to say I had to have one .. and the plea went out on social media to acquire one whilst we were in Belgium doing the day job.

No joy whilst I was away, as it was selling out as quickly as the mag was hitting the shelves. To put it blunty they were “as rare as rocking horse poo” –  but I did manage to grab the last TWO copies in my local Sainsburys store on my way back from Belgium. I did feel slightly guilty taking the last copies BUT Stitch needs to talk and Nathan wanted to give the home made alexa project a go and this kit is just what he needs.

So I had my kit, but no pi – so off to pimoroni to grab me a PI .. being new to the Pi, I opted for the starter kit so I would have everything I needed. The AIY kit states it needs the Pi3, but a few people have managed to get it working with a pi zero w – which for my Stitch project would be better as it will need to run headless, run off a usb power pack (like you use for charging your phone), and basically sit in Stitch’s head. Let’s not run before I can walk I thought so all my testing so far has been with the Pi3.


What I have used (so far)


A shiny new RasberryPi 3b from the lovely people at Pimoroni


A copy of MagPi 57


The fab AIY kit that comes with MagPi 75


Micro SD card which you need to load the voice kit sd image.


Etcher.io a really handy tool for making sd cards bootable with the image of your choice

So now everything is assembled we can get down to the good bit – building the kit and editing the code – dangerous for an admin to have a go at coding I know .. visit back soon for part 2 of #projecttalkie 🙂

Can you spare an item to help raise money for two amazing causes?

Friends, Geeks, Costumers, fellow Disney fans, lovers of star wars, friends of friends, basically everyone ….

As some of you know I am part of a team behind a charity convention later this year (August 7th).
LargeImage

Our aim is to raise much needed funds for two amazing causes

Demelza Hospice Care for Children – a charity supporting children and young people (0-19) who are not expected to reach adulthood, and offer support to their families across Kent, South East London and East Sussex

Feel the Force Day (registed charity – 1st sensory legion) – Feel the Force Day is an accessible film and TV event designed for visually impaired and disabled people. Days include tactile costumes, props, vehicles, TV and film related smell jars… plus a few new and original ideas at each event.

All proceeds from Invictacon will be split between the two charities above – as you will agree both great causes.


So how can you help us?

The Invictacon team are looking for donations from you .. not in the monitory sense (although cash donations are lovely) – we are looking for items that we can use in our raffle and blind auction.

It can be anything related to film, tv, sci-fi, comic books, gaming, sport, any fandoms etc… that will help us raise some funds for Demelza and FTFD


How can you get it to us?

  • IBM/LOTUS/Conference people – we are at Connect 2016 in Orlando and Engage 2016 in Einhoven – bring it along (as long as i can fit it in a case)
  • Costuming friends – we will be at a few sci-fi / comic cons this year – let us know where you will be and we will come and collect or arrange for a friend to accept it on our behalf
  • Anyone else -You can contact us to arrange pick up (if you are local to the southeast of the UK) or postal / courier


Any donations will be gratefully received – and we would love to tell the world that you have donated a prize (if you don’t want us to do that, that is also ok)

We are also looking for category sponsors for the costume / cosplay competition (or for the whole comp) – a small prize, trophy and certificate will be presented in each category

  • Kids under 10
    Kids 10 – 16
    Adults 16 and over
    Best Group

The competition is being judged by the lovely Alan Flyng – Star wars (ESB / ROTJ – storm-trooper and imperial officer) who is an amazing costume maker / wardrobe master who has worked on thousands of TV, film and theatrical productions.


Thank you

So my plee for help ends .. if there is anyway you could part with something no matter how small to help us raise funds for both causes the whole team would be so so grateful.

The team and I can not thank you enough – we are all volunteers and get nothing but a warm and fuzzy feeling for raising some well needed funds for two amazing causes.


So thank you

Sharon, Sam, Nathan, David and Nicky


flyer_back FlyerCharityFront

Calling my developer friends

Hello developer types .. as most of you know I do a lot of work with the iCosplay anti-bullying charity and we need some help (please).

We are looking to reward costumers for doing charity work, community work, visiting sick kids in hosplital, etc . Their progress will be voted on via FB which is straight forward enough – but at the end of the year the top community costumers will be invited to the Wyntercon event in Eastbourne (in Oct 2015)  for the *end of season* pageant where ultimately they will be recognized for everything they have done throughout the year.

We are after a mobile app that we can use for the team to mark each of the entrants – on their costume, community assistance and charity work and anyother details that they can provide about what they have done through-out the year. It needs to be able to run on ‘droid and ios, the backend / server can be anything really as long as I can put up a server for it ..

If any one can help out .. we will be eternally grateful, will happily promote your awesome skills via the iCosplay site and FB page and you will get tickets for the Wyntercon event.

Thank you in advance for any help you can give us on this .. please ping me via twitter / FB or Skype if you think you can help us ..