

I am sure that lots of you have installed or started migrations to Connections 6 by now .. but I have found a couple of gotchas across the installs and updates that I have managed so far.
I am listing them here for sanities sake as I know when we google an error – this blog will show up 🙂
Connections 6 itself
Generally this was a nice smooth install and all worked as it should in a clean 6 environment
On testing a migration though I found issues when trying to migrate some of the DBs.
After dropping and restoring the DBs some were not updating to the latest DB2 version – this is resolved by running the update DB command
db2 upgrade db <DBNAME>
this upgrades the DB to the latest DB2 version – I run this after each restore command now to ensure the DB does update
for example
db2 restore db BLOGS from E:\install\V55_Backup\db2_backup taken at 20170718123342 ON E:\ into BLOGS
db2 upgrade db BLOGS
The metrics DB would not restore as it was complaining about heap size – after a quick google on the error I found a page suggesting just to change the application heap size using the following command
db2 UPDATE DB CFG FOR METRICS USING APPLHEAPSZ 4000
This resolved the problem and the metrics DB could be restored
I have also seen issues with the Connections DB update wizard when the databases have a lot of data. In a mature environment I generally run through the wizard and save the update commands to a text file. Then execute them manually from the db2 command window – for example
Activities
 1. E:\IBM\SQLLIB\bin\db2cmd -c -w -i db2 -td@ -vf connections.sql\activities\db2\upgrade-55CR2-60.sql
 2. E:\IBM\SQLLIB\bin\db2cmd -c -w -i db2 -td@ -vf connections.sql\activities\db2\appGrants.sql
 3. E:\IBM\SQLLIB\bin\db2cmd -c -w -i db2 -td@ -vf connections.sql\activities\db2\reorg.sql
 4. E:\IBM\SQLLIB\bin\db2cmd -c -w -i db2 -td@ -vf connections.sql\activities\db2\runstats.sql

Blogs
 1. E:\IBM\SQLLIB\bin\db2cmd -c -w -i db2 -td@ -vf connections.sql\blogs\db2\upgrade-55-60.sql
 2. E:\IBM\SQLLIB\bin\db2cmd -c -w -i db2 -td@ -vf connections.sql\blogs\db2\appGrants.sql
 3. E:\IBM\SQLLIB\bin\db2cmd -c -w -i db2 -td@ -vf connections.sql\blogs\db2\reorg.sql
 4. E:\IBM\SQLLIB\bin\db2cmd -c -w -i db2 -td@ -vf connections.sql\blogs\db2\runstats.sql

Bookmarks
 1. E:\IBM\SQLLIB\bin\db2cmd -c -w -i db2 -td@ -vf connections.sql\dogear\db2\upgrade-55-60.sql
 2. E:\IBM\SQLLIB\bin\db2cmd -c -w -i db2 -td@ -vf connections.sql\dogear\db2\appGrants.sql
 3. E:\IBM\SQLLIB\bin\db2cmd -c -w -i db2 -td@ -vf connections.sql\dogear\db2\reorg.sql
 4. E:\IBM\SQLLIB\bin\db2cmd -c -w -i db2 -td@ -vf connections.sql\dogear\db2\runstats.sql

.................. ETC.
For some reason if you have large DBs the wizard struggles massively. Running the commands manually from the command window also allows you to dump each commands logs out into a text file if you need to. Great for debugging and used a LOT when I ran through the AIX Oracle to Windows DB2 migration last year.
Once the DBs were restored and updated run the reorg and runstats against each of the DBs before you start it up and if you can also run the clearScheduler.sql for each DB.
That should sort out the majority of DB issues you may see during the update.
Connections TouchPoint
Again a fairly easy process once you work out what the documentation is talking about – things of note
The document speaks of copying the touchpoint folder contents to the htdocs directory –
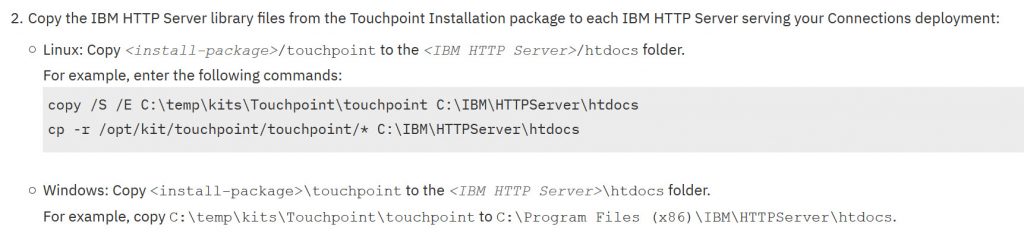
you have to copy the entire folder – for example
Copy files from E:\install\Connections\Touchpoint\touchpoint to E:\IBM\HTTPServer\htdocs\touchpoint the wording in the documentation doesn’t really make that clear.
All of the paths etc in the documenation are case sensitive.
Another thing of note which has tripped me up twice now so I have to blog it (thank you Ben for the extra eyes on this one) is the contents of the touchpoint.deploy.properties
The touchpoint.deploy.properties which is included in the install files is different from the example the documentation gives, we basically mix the two and have the contents of the file looking like this
# when install to a clustered environment, provide clusterName.
# when install to a standalone server, provide node and server name.
clusterName=apps
#nodeName=icbvtDB2Node01
#serverName=server1

# setting required REE custom properties
ree.prop.image.upload.path=E:/IBM/CnxData/shared/touchpoint/upload_pic
ree.prop.profiles.app.entrypoint.host=connections.url.com
ree.prop.profiles.app.entrypoint.scheme=https
ree.prop.profiles.app.entrypoint.port=443
NOTE: If using windows the image upload path must have / the linux way not \ the windows way. It will fail if you don’t even if you have it in “E:\IBM\etc…” it appears to be a java / python thing and the error will complain that it can not pass the properties file if the slashes are not /
IBM Docs CR2
To use IBM Docs with Connections 6 you must update to CR2 for Docs – that is fine (and see previous blog posts about issues with applying the CR2 fix).
There is an awesome gotcha that my good friend Roberto pointed me in the direction of the fix for – this one was a good one (thank you Marti for writing the blog)
The symptoms are Docs editing works fine, but when attempting to view a file the error : CLFAF400W: Can’t access the document repository appears
Its a super quick fix – edit the viewer-config.json which can be found in the (i.e \IBM\WebSphere\AppServer\profiles\Dmgr01\config\cells\<cell name>\IBMDocs-config)
Under the section
"components": [
 {
 "config": {
 "uploadRepository": "lcfiles",
find the line
"class" : "com.ibm.concord.viewer.lc3.repository.LCFilesEJBRepository",
and replace it with
"class": "com.ibm.concord.viewer.lc3.repository.LCFilesCMISRepository"
Just above that you can see the files_path
"files_path": "E://IBM//CnxData//shared/files/upload"
Add the additional info to that section
 "j2c_alias": "connectionsAdmin",
 "s2s_method": "j2c_alias",
 "server_url": "https://connections.url.com/files",
 "files_path": "E://IBM//CnxData//shared/files/upload"
So the full section will now look like this:
 "components": [
 {
 "config": {
 "uploadRepository": "lcfiles",
 "adapters": [
 {
 "config": {
 "j2c_alias": "connectionsAdmin",
 "s2s_method": "j2c_alias",
 "server_url": "https://connections.url.com/files",
 "files_path": "E://IBM//CnxData//shared/files/upload"
 },
 "id": "lcfiles",
 "class": "com.ibm.concord.viewer.lc3.repository.LCFilesCMISRepository"
 },
Save the file and do a full sync once a restart of the viewer app is done the viewer will now work.
One other thing of note when it comes to migrating the Docs data and DBs is that almost every time you do a migration the wasadmin user will be out of sync and you will see duplicate user issues in the log.
easily resolved by running the syncMember command from the DMGR\bin directory
wsadmin.bat -lang jython

execfile("filesAdmin.py")

FilesMemberService.syncMemberExtIdByLogin("wasadmin")
Other things you should do once the docs data has been migrated is to run the generate thumbnails command (also from wsadmin in the filesAdmin section)
wsadmin.bat -lang jython

execfile("filesAdmin.py")

FilesThumbnailService.generateForAllFiles()
Also to migrate any drafts from the docs installer directory i.e
wsadmin.bat -lang jython -f E:/IBM/ConnectionsDocs/Docs/installer/docs/tasks/start_migration_tool.py
Hopefully you won’t come across any or more than one of these issues, but if you do hopefully there will be a quick resolution.
If I find anything else I will be sure to blog them.