Issues with IBM Connections 5 / 5.5 and Chrome 60

There is a known issue with Connections 5 CR4 and all versions of Connections 5.5 when using Chrome version 60.

It affects events not being displayed and errors relating to events in the UI. It has also been reported that comments can be affected also.

After multiple BP’s and Customers reported this IBM Support have come up with a fix very quickly.

The fix you need is IFLO92844 – currently it is only available from IBM support – not sure how long it will be until it is available on fix central.

Open a PMR with IBM and reference these 3 PMR numbers: 76364,082,000 – 76379,082,000 – 38309,756,000 and ask for IFLO92844. You will need to specify the Connections version and CR.

The fix updates the Common app and takes about 10 mins to deploy.

Thank you IBM Connections Support / Dev for resolving this so quickly

Connections 6 migration observations

I am sure that lots of you have installed or started migrations to Connections 6 by now .. but I have found a couple of gotchas across the installs and updates that I have managed so far.

I am listing them here for sanities sake as I know when we google an error – this blog will show up 🙂


Connections 6 itself


Generally this was a nice smooth install and all worked as it should in a clean 6 environment

On testing a migration though I found issues when trying to migrate some of the DBs.

After dropping and restoring the DBs some were not updating to the latest DB2 version – this is resolved by running the update DB command

db2 upgrade db <DBNAME>

this upgrades the DB to the latest DB2 version – I run this after each restore command now to ensure the DB does update

for example

db2 restore db BLOGS from E:\install\V55_Backup\db2_backup taken at 20170718123342 ON E:\ into BLOGS
db2 upgrade db BLOGS


The metrics DB would not restore as it was complaining about heap size – after a quick google on the error I found a page suggesting just to change the application heap size using the following command

db2 UPDATE DB CFG FOR METRICS USING APPLHEAPSZ 4000

This resolved the problem and the metrics DB could be restored


I have also seen issues with the Connections DB update wizard when the databases have a lot of data. In a mature environment I generally run through the wizard and save the update commands to a text file. Then execute them manually from the db2 command window – for example

Activities
 1. E:\IBM\SQLLIB\bin\db2cmd -c -w -i db2 -td@ -vf connections.sql\activities\db2\upgrade-55CR2-60.sql
 2. E:\IBM\SQLLIB\bin\db2cmd -c -w -i db2 -td@ -vf connections.sql\activities\db2\appGrants.sql
 3. E:\IBM\SQLLIB\bin\db2cmd -c -w -i db2 -td@ -vf connections.sql\activities\db2\reorg.sql
 4. E:\IBM\SQLLIB\bin\db2cmd -c -w -i db2 -td@ -vf connections.sql\activities\db2\runstats.sql

Blogs
 1. E:\IBM\SQLLIB\bin\db2cmd -c -w -i db2 -td@ -vf connections.sql\blogs\db2\upgrade-55-60.sql
 2. E:\IBM\SQLLIB\bin\db2cmd -c -w -i db2 -td@ -vf connections.sql\blogs\db2\appGrants.sql
 3. E:\IBM\SQLLIB\bin\db2cmd -c -w -i db2 -td@ -vf connections.sql\blogs\db2\reorg.sql
 4. E:\IBM\SQLLIB\bin\db2cmd -c -w -i db2 -td@ -vf connections.sql\blogs\db2\runstats.sql

Bookmarks
 1. E:\IBM\SQLLIB\bin\db2cmd -c -w -i db2 -td@ -vf connections.sql\dogear\db2\upgrade-55-60.sql
 2. E:\IBM\SQLLIB\bin\db2cmd -c -w -i db2 -td@ -vf connections.sql\dogear\db2\appGrants.sql
 3. E:\IBM\SQLLIB\bin\db2cmd -c -w -i db2 -td@ -vf connections.sql\dogear\db2\reorg.sql
 4. E:\IBM\SQLLIB\bin\db2cmd -c -w -i db2 -td@ -vf connections.sql\dogear\db2\runstats.sql

.................. ETC.

For some reason if you have large DBs the wizard struggles massively. Running the commands manually from the command window also allows you to dump each commands logs out into a text file if you need to. Great for debugging and used a LOT when I ran through the AIX Oracle to Windows DB2 migration last year.


Once the DBs were restored and updated run the reorg and runstats against each of the DBs before you start it up and if you can also run the clearScheduler.sql for each DB.

That should sort out the majority of DB issues you may see during the update.


Connections TouchPoint


Again a fairly easy process once you work out what the documentation is talking about – things of note

The document speaks of copying the touchpoint folder contents to the htdocs directory –


you have to copy the entire folder – for example

Copy files from E:\install\Connections\Touchpoint\touchpoint to E:\IBM\HTTPServer\htdocs\touchpoint the wording in the documentation doesn’t really make that clear.

All of the paths etc in the documenation are case sensitive.

Another thing of note which has tripped me up twice now so I have to blog it (thank you Ben for the extra eyes on this one) is the contents of the touchpoint.deploy.properties

The touchpoint.deploy.properties which is included in the install files is different from the example the documentation gives, we basically mix the two and have the contents of the file looking like this

# when install to a clustered environment, provide clusterName.
# when install to a standalone server, provide node and server name.
clusterName=apps
#nodeName=icbvtDB2Node01
#serverName=server1

# setting required REE custom properties
ree.prop.image.upload.path=E:/IBM/CnxData/shared/touchpoint/upload_pic
ree.prop.profiles.app.entrypoint.host=connections.url.com
ree.prop.profiles.app.entrypoint.scheme=https
ree.prop.profiles.app.entrypoint.port=443

NOTE:  If using windows the image upload path must have / the linux way not \ the windows way. It will fail if you don’t even if you have it in “E:\IBM\etc…” it appears to be a java / python thing and the error will complain that it can not pass the properties file if the slashes are not /


IBM Docs CR2


To use IBM Docs with Connections 6 you must update to CR2 for Docs – that is fine (and see previous blog posts about issues with applying the CR2 fix).

There is an awesome gotcha that my good friend Roberto pointed me in the direction of the fix for – this one was a good one (thank you Marti for writing the blog)

The symptoms are Docs editing works fine, but when attempting to view a file the error : CLFAF400W: Can’t access the document repository appears

Its a super quick fix – edit the viewer-config.json which can be found in the (i.e \IBM\WebSphere\AppServer\profiles\Dmgr01\config\cells\<cell name>\IBMDocs-config)

Under the section

"components": [
 {
 "config": {
 "uploadRepository": "lcfiles",

find the line

 "class" : "com.ibm.concord.viewer.lc3.repository.LCFilesEJBRepository",

and replace it with

 "class": "com.ibm.concord.viewer.lc3.repository.LCFilesCMISRepository"

Just above that you can see the files_path

 "files_path": "E://IBM//CnxData//shared/files/upload"

Add the additional info to that section

 "j2c_alias": "connectionsAdmin", 
 "s2s_method": "j2c_alias", 
 "server_url": "https://connections.url.com/files",
 "files_path": "E://IBM//CnxData//shared/files/upload"

So the full section will now look like this:

 "components": [
 {
 "config": {
 "uploadRepository": "lcfiles", 
 "adapters": [
 {
 "config": {
 "j2c_alias": "connectionsAdmin", 
 "s2s_method": "j2c_alias", 
 "server_url": "https://connections.url.com/files",
 "files_path": "E://IBM//CnxData//shared/files/upload"
 }, 
 "id": "lcfiles", 
 "class": "com.ibm.concord.viewer.lc3.repository.LCFilesCMISRepository"
 },


Save the file and do a full sync once a restart of the viewer app is done the viewer will now work.


One other thing of note when it comes to migrating the Docs data and DBs is that almost every time you do a migration the wasadmin user will be out of sync and you will see duplicate user issues in the log.

easily resolved by running the syncMember command from the DMGR\bin directory

wsadmin.bat -lang jython

execfile("filesAdmin.py")

FilesMemberService.syncMemberExtIdByLogin("wasadmin")


Other things you should do once the docs data has been migrated is to run the generate thumbnails command (also from wsadmin in the filesAdmin section)

wsadmin.bat -lang jython

execfile("filesAdmin.py")

FilesThumbnailService.generateForAllFiles()


Also to migrate any drafts from the docs installer directory i.e

wsadmin.bat -lang jython -f E:/IBM/ConnectionsDocs/Docs/installer/docs/tasks/start_migration_tool.py


Hopefully you won’t come across any or more than one of these issues, but if you do hopefully there will be a quick resolution.

If I find anything else I will be sure to blog them.

It’s that time of year again ..

I am Running for Feel the Force Day …. My partner in crime Sam will be joining me again this year, along with Jonathan and Mandy will make up the #TeamRun4FTFD to raise funds.

Jonathan has cerebal palsy and he doesn’t let that slow him down. Mad on trucks, cars and any kind of awesome vehicle (just see Shaw on Tour for details), he has recently done a bunch of exciting stuff including running (in a race chair), ice skating and trampolining.
Mandy is the biscuit queen 🙂 Famous for her cakes and biscuits at Feel the Force Day – last year she raised over £250! As well as baking she is Jonathan’s carer and they are a formidable team .. We are really looking forward to having them on the journey this year.

For those of you who do not know what Feel the Force Day is ..  Feel the Force Day events are film and TV conventions with a difference. The events are designed around disabled people and make them as accessible as possible. Access does not just mean a disabled loo and a ramp, it’s about attitude, contact and all the subtle things that make things easier. Most conventions have signs to do not touch – FTFD events are all about touch and smell in every sense. Costumers make themselves available to visually impared guests to touch, quiet rooms are available for guests who can not cope with the hussle and bussle of a busy event and there are one on one sessions with costumes and props for guests too.


So I am asking kindly for any donations to our team and for you to spread the word ..


Any sharing or *pimping* of the cause would be amazing .. and thank you to those who donated last year and have this year too .. I feel so pasionate about this cause and it is entirely run and funded by volunteers.


PDF version of the poster can be found here

WebSite: http://run4ftfd.co.uk

Facebook: Run4FTFD

Twitter: Run4FTFD

Instagram: Run4FTFD

Sponsor page: http://bit.ly/run4ftfd17


THANK YOU so much

Let’s get Stitch talking – Project #talkie pt 3

So after building the kit and testing that it worked .. It was time to get creative ..

there are some examples on what to do code wise on the AIY kit voice site

First I had to go through the billing set up and processes. Even though the code is free, and the kit is free and they give you $300 worth of credit – you still have to set up billing. It was a pain as I already had a cloud dev account for some of the APIs I use on bit of my sites, but eventually I worked it out – I may have cussed a little. Once that was sorted and I created the credentials I needed I could copy those to the right place and I was good to start experimenting.

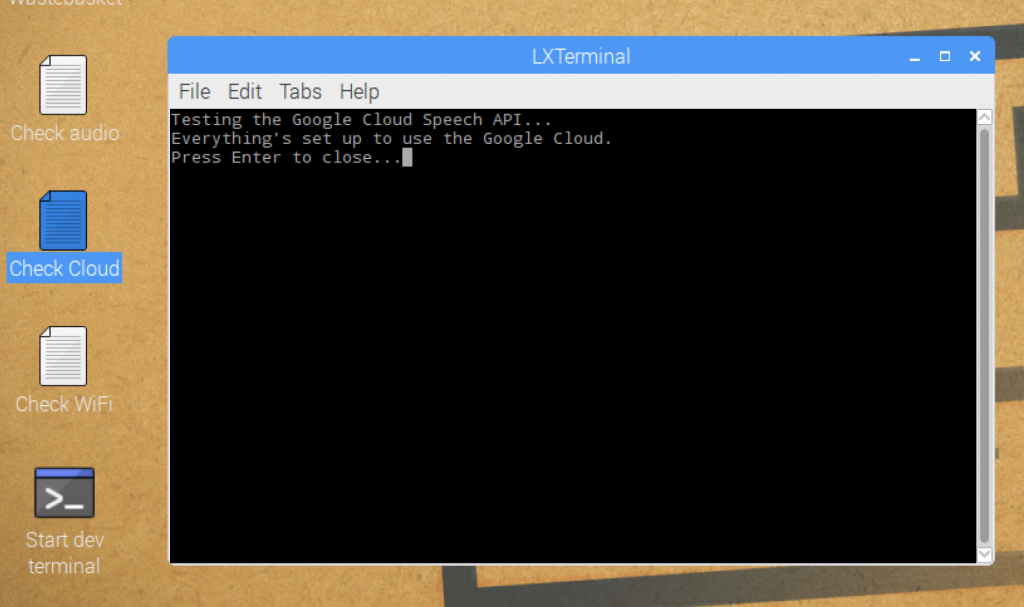
There is even a quick script that checks it all for you .. if there are any errors – you have missed a step.


Now its all set up to use the cloud speach API we are good to start playing.

First thing is to change the default API to use the cloud speech .. edit the

/home/pi/.config/voice-recognizer.ini

ensure that the cloud-speech = true line is uncommented

# Uncomment to enable the Cloud Speech API for local commands.
cloud-speech = true

Now we are all set to use local commands and not the google assistant.

Firstly I wanted to make sure I could get a sound to play when I pressed the button, in the /home/pi/voice-recognizer-raspi/src directory I created a new file and called it raspi-audio-button.py

#!/usr/bin/env python

import vlc

from time import sleep
 
import RPi.GPIO as GPIO
 
GPIO.setmode(GPIO.BCM)
GPIO.setup(23, GPIO.IN)

while True:
    if (GPIO.input(23) == False):
        p=vlc.MediaPlayer('file:///home/pi/Downloads/StitchSounds/hi.mp3')
        p.play()

    sleep(0.1);

This basically tells the AIY kit to play the hi sound when I press the button. After a bit of a fiddle to get vlc working (but that was my lack of skills) it works great .. I run the script from the src directory using the “dev terminal” on the desktop (which in turn is just another script /home/pi/bin/voice-recognizer-shell.sh) and it works ..

I press the button and the box says Hi in Stitch’s voice 🙂


Awesome ..  so lets move on to actually creating the code to get Stitch to talk.


Edit the action.py which lives in /home/pi/voice-recognizer-raspi/src

There are 2 chunks of code we needed to add ..

a class and a set of voice commands


The Class

We took the code from the RepeatAfterMe class and editied it .. I couldn’t have done this piece without my good friend Tim Clark who managed to work out what we needed to do to.


RepeatAfterMe Example

# Example: Repeat after me
# ========================
#
# This example will repeat what the user said. It shows how you can access what
# the user said, and change what you do or how you respond.

class RepeatAfterMe(object):

"""Repeats the user's command."""

def __init__(self, say, keyword):
 self.say = say
 self.keyword = keyword

def run(self, voice_command):
 # The command still has the 'repeat after me' keyword, so we need to
 # remove it before saying whatever is left.
 to_repeat = voice_command.replace(self.keyword, '', 1)
 self.say(to_repeat)


Stich Says Class

We have created the class below if the keyword = a certain word spoken the coresponding mp3 is played using vlc player


# STITCH : Classes
# ========================
#
# Classes to make Stitch talk are here
# 

class StitchSays(object):
    """Plays a Stich sound file based on the user's command."""

    def __init__(self, keyword):
        self.keyword = keyword


    def run(self, voice_command):
        keyword = self.keyword
        if keyword == 'Thanks':
            soundmp3 = "file:///home/pi/Downloads/StitchSounds/thankyou.mp3"
        elif keyword == 'Laugh':
            soundmp3 = "file:///home/pi/Downloads/StitchSounds/laugh.mp3"
        elif keyword == 'Nutty':
            soundmp3 = "file:///home/pi/Downloads/StitchSounds/nutty.mp3"
        elif keyword == 'No':
            soundmp3 = "file:///home/pi/Downloads/StitchSounds/noTalk.mp3"
        elif keyword == 'Sing':
            soundmp3 = "file:///home/pi/Downloads/StitchSounds/sing.mp3"
        elif keyword == 'Behind':
            soundmp3 = "file:///home/pi/Downloads/StitchSounds/ohana.mp3"
        elif keyword == 'With':
            soundmp3 = "file:///home/pi/Downloads/StitchSounds/withFamily.mp3"
        elif keyword == 'Love':
            soundmp3 = "file:///home/pi/Downloads/StitchSounds/loveyou.mp3"
        elif keyword == 'Name':
            soundmp3 = "file:///home/pi/Downloads/StitchSounds/nameStitch.mp3"

        p = vlc.MediaPlayer(soundmp3)
        p.play()


Once we have a class defined the keywords must be added. Again we used repeat after me as an example

    actor.add_keyword(_('repeat after me'),
                      RepeatAfterMe(say, _('repeat after me')))


We add the word I wll speak, then the class and keyword

For example I say "Thanks" and the thanks mp3 is played

    # =========================================
    # STITCH! voice commands here.
    # =========================================

    actor.add_keyword(_('Thanks'), StitchSays(_('Thanks')))
    actor.add_keyword(_('Giggle'), StitchSays(_('Laugh')))
    actor.add_keyword(_('Nutty'), StitchSays(_('Nutty')))
    actor.add_keyword(_('No'), StitchSays(_('No')))
    actor.add_keyword(_('Sing'), StitchSays(_('Sing')))
    actor.add_keyword(_('Oh'), StitchSays(_('Behind')))
    actor.add_keyword(_('Family'), StitchSays(_('With')))
    actor.add_keyword(_('Love'), StitchSays(_('Love')))
    actor.add_keyword(_('Name'), StitchSays(_('Name')))


This is probably not the most elegant way to do this .. but it WORKS ..

I was SO pleased that we managed to get this far ..

The issue now is that if the Pi can’t understand what i say .. it throws an error and speaks in the robot voice .. that is the next thing to fix – we will do that in part 4 of #projecttalkie


Building the AIY – Project #talkie pt2

Before I could attempt to get creative with the code examples – we first had to build the kit and make sure it worked with the things and code that was provided.

I have used the images from the aiyprojects.withgoogle.com/voice page. They are great pictures and show step by step how to put things together, I may have forgotten to take step by step pics as we built it too.

Prep the SD Card

With the voice SD image we downloaded in pt1 – use etcher to flash the SD card and get it ready for the Pi.

The voice image is a version of Rasbrian with some added extra’s to help with the project.


Second Step – Build the hardware

The hardware was pretty straight forward … following the instructions on the AIY site


Once it was all assembled put the prepped SD card in the pi .. its too difficult to wrangle it in once in the box.

Step three – Build the box

This bit is a bit like origami with cardboard ..  I may have got a bit sweary at this point .. but if you follow the picture guide and work out what way up things need to go you are good .. it took longer to build the box than add the HAT to the Pi …

Step four – Put the Pi Hat in the box


Took a bit of sliding and making sure the cables weren’t tangled

Make sure all the ports line up as they should so you can plug the pi in


Now to fit the arcade button, switch, light and wire it up .. Then line the mic up and tape it on the inside flap of the box.


As if by magic .. it is done .. we have a BOX of AIY fun to start playing with

Plug it in .. and update it

Plug you pi in and fire it up. You need a USB keyboard and mouse and HDMI connection to a monitor ot TV. I had an issue with getting some of the built in code to run – this was resolved by updating the pi. Boot it up and connect it to the wireless network and then update.

sudo apt-get update

sudo apt-get upgrade

Once your pi has updated you should be good. You have a lovely desktop environment with all the example code ready installed to play with


Verify its working

Let’s check the audio first – on the desktop there is a Check Audio file. Double click it to run. the speaker test will play first, you are then prompted to speak so it can test the playback.


Here is a short video of it working.


There is also a check wifi file .. but we know the wifi is good as we have updated already .. but if you REALLY want to test it .. go for it 🙂


We are ALL set and ready to go .. next step is playing with the example code .. come back for part 3 of #projecttalkie and I will show you what I did next

Who knew my love for StarWars would win me a prize

On May the 4th (also known as StarWars day – you work it out) one of my good friends and former co worker (not sure how he put up sitting opposite me for 2 and a half years 🙂 ) Mr Dave Sheryn pinged me with an interesting link to a starwars costume competition ..

“That’ll be fun”, I thought, “will give it ago .. have a snowballs chance in hell of winning” – so I posted this pic of me

With the message

O well if we are showing off star wars costumes .. this is my mandalorian - made, painted & worn by me :D

Didn’t expect to hear a thing back ..

For those of you that know about my StarWars obsession – I spent about 2 years inbetween life, work, illness, getting married etc. to make my mando costume – it was a labour of love which I made and painted myself and its always in upgrade mode 🙂

Imagine my surprise when I recieved this tweet on Revenge of the 5th (that’s the 5th of may incase you were wondering) …

O M G was one of the nicer expletives that may have left my lips …. I NEVER win anything …

The prize is a Nerf Millenium Falcon and I can’t thank The Freaky Clown enough for this .. thanks again for picking me

It’s bloody amazing … I haven’t unboxed it yet as I am worried I will spend hours playing with it and not want to stop 🙂

I do have plans for it though .. I am going to lend it to Feel the Force Day for their touch table – and i really need to find it somewhere to live at home ..


Project #talkie pt1 – getting to grips with a rasberrypi

What’s all this #talkie stuff about then?

So I have been posting stuff on facebook twitter and instragram with the #projecttalkie or #talkie hash tag ..


Most of you know that I costume .. and as well as my love for star wars (and my mandalorian costume), I also LOVE to costume as Stitch …

You can see me here as my favourite fluffy blue alien experiment (626) with my good pal and all around lovely Captain America friend Mr James Budd.

Again most of you know that i am a HUGE supporter and raise money for an amazing cause – Feel the Force Day. FTFD events are for guests with disabilities – physical and mental – and we have a lot of guests that are visually impared. Stitch is great for touch as he is big, blue and fluffy – but I have been desperate to get him to talk and to allow him to interact with the FTFD guests.

It would be super cool for other events to have Stitch able to interact with people as kids and adults LOVE him 🙂

The traditional sound glove method wouldn’t work as his hands are big and bulky and I would be limited to 4 sounds.. so thinking cap was well and truly on …


Fast forward to sitting on the ferry on the way to the amazing Engage user group. My good buddy, work colleague, fellow IBM Champion and all around lovely chap Mr Tim Clark. He told me that Issue 57 of the MagPi (the best rasberrypi magazine) came with a Goolge powered AIY kit – which is a handy little voice had and the code to enable the use of a handy little voice recognizer you can connect to the Google Assistant. All in a handy little cardboard cube, powered by a Raspberry Pi.

Could I use that? I wondered, to get Stitch to talk .. out game Tim’s version of the mag and we had a looksy through it .. HELL YEAH .. we both decided it was worth a go .. all I needed extra was a PI3 – which I wanted to get one for tinkering with anyways …

How much for this amazing voice kit that came with the MagPi? A bargain at £5.99 – yup a whole kit to get voice recognizing to work in a similar way to alexa and siri but WAY better as i can customize it – FOR LESS THAN 6 QUID !!!! Needless to say I had to have one .. and the plea went out on social media to acquire one whilst we were in Belgium doing the day job.

No joy whilst I was away, as it was selling out as quickly as the mag was hitting the shelves. To put it blunty they were “as rare as rocking horse poo” –  but I did manage to grab the last TWO copies in my local Sainsburys store on my way back from Belgium. I did feel slightly guilty taking the last copies BUT Stitch needs to talk and Nathan wanted to give the home made alexa project a go and this kit is just what he needs.
So I had my kit, but no pi – so off to pimoroni to grab me a PI .. being new to the Pi, I opted for the starter kit so I would have everything I needed. The AIY kit states it needs the Pi3, but a few people have managed to get it working with a pi zero w – which for my Stitch project would be better as it will need to run headless, run off a usb power pack (like you use for charging your phone), and basically sit in Stitch’s head. Let’s not run before I can walk I thought so all my testing so far has been with the Pi3.


What I have used (so far)


A shiny new RasberryPi 3b from the lovely people at Pimoroni


A copy of MagPi 57


The fab AIY kit that comes with MagPi 75


Micro SD card which you need to load the voice kit sd image.


Etcher.io a really handy tool for making sd cards bootable with the image of your choice

So now everything is assembled we can get down to the good bit – building the kit and editing the code – dangerous for an admin to have a go at coding I know .. visit back soon for part 2 of #projecttalkie 🙂

Docs 2.0 CR2 – here we go again

I am blogging this mainly so I remember how to solve this

Big thanks to fellow ICS community member and all round great guy Robert Farstad for blogging this

Again you can see a problem when patching Docs 2 to CR2 as it can’t find the FQDN of the hosts.

The code has changed so it’s not possible to use the work around that we had previously.

There is a slight twist to getting it to work which Rob has explained fabulously so thank you mate .. you saved me a lot of grief .. and even IBM point people to that blog as they did when I opened a PMR to find out how to fix it .. 🙂

Migrating Connections DB from Oracle to DB2 part 3

In part 3 of the series we will actually attempt to migrate the data.


Migrating Connections DB from Oracle to DB2

In my experience the database migration is always most time consuming, so I always do the database first

Use the text file of Commands that we created in part 2.

  • Back up the exisitng Connections databases
  • Drop database, create database, app grants (for homepage also initdata, and re org and run stats)
  • CR update scripts
  • Pre DB fixer script
  • Run the DBT command
  • Application specific scripts (IBM provided addional fixup scripts for Blogs, Files and Wikis for me)
  • Post DB fixer script
  • Re org script
  • Run stats script

I run the commands one database at a time. This made it much easier for troubleshooting issues and ensuring that each database was in a consistent migrated state before moving onto the next – if I had issues I made notes in the commands text file and moved on to the next DB.

Homepage took a very long time to migrate as there was a LOT of data here, the other DBs I had issues with were Files, Wikis and Blogs which are the ones that IBM expect to cause issues. I will use Blogs as an example on how to troubleshoot later.

I also had some DBs that were already using DB2 like IBM Docs, Surveys app for Communities and ProjectExec – we backed these up also and migrated them across to the server in the sameway that we would do a normal DB migration – Droped, restored and checked the DB roles and permission. These all came across with no issues.


Troubleshooting

It goes without saying that you should ALWAYS RUN THIS ON A TEST / DEV SERVER FIRST!

If i could have this as scrolling flashing marquee text with it playing a siren I would. I CAN NOT emphasise enough how important it is that you should run this in a test environment – which we did 3 times before actually doing it for real.

The most troubleshooting I did on this project revolved around the dbt transfer script (see example below).

The database schemas are quite different between types and even between OS versions so there will be a lot of tinkering to resolve the problems. Typically its where one DB type expects a NULL and the other expects a NOTNULL

Firstly run the script

java -cp D:\IBM\Connections\ConfigEngine\lib\DBT_HOME\dbt.jar;D:\IBM\Oracle\ojdbc6.jar;D:\IBM\SQLLIB\java\db2jcc.jar com.ibm.wps.config.db.transfer.CmdLineTransfer -logDir D:\IBM\Connections\ConfigEngine\lib\DBT_HOME\logs -xmlfile D:\IBM\Connections\ConfigEngine\lib\DBT_HOME\files\activities.xml -sourcepassword sourcepassword -targetpassword targetpassword

If there are problems it will be shown in the console and written out to a log file.

for example you may see an error like this:

[07/20/16 13:22:56.756 PDT] com.ibm.db2.jcc.am.SqlIntegrityConstraintViolationException: Error for batch element #50: DB2 SQL Error: SQLCODE=-407, SQLSTATE=23502, SQLERRMC=TBSPACEID=3, TABLEID=5, COLNO=1, DRIVER=3.65.110

All of these issues I saw related to the NULL / NOTNULL issue.

The next step is to make a note of the tablespace id, table id and column number as we need those for an sql query.

Fire up your DB client and run the following query


SELECT C.TABSCHEMA, C.TABNAME, C.COLNAME
 FROM SYSCAT.TABLES AS T, SYSCAT.COLUMNS AS C
 WHERE T.TBSPACEID = 3 AND T.TABLEID = 5 AND C.COLNO = 1 AND C.TABSCHEMA = T.TABSCHEMA AND C.TABNAME = T.TABNAME

Use the TBSPACEID, TABLEID & COLNO from the error message

The query will report back the DBName (as the TABSCHEMA), the table name (as TABNAME) and the column name (as COLNAME)

 TABSCHEMA     TABNAME             COLNAME
 ---------     ---------------     --------
 BLOGS        ROLLERLOGINNAME        USERNAME

Now you have the name of table and column with the null/not null issue.

The next step is to edit the createDB.sql script to make the change in the example here remove the not null from the username field as below.

create table BLOGS.rollerloginname (
    userid             varchar(48) not null,
    username           varchar(255),
    ORG_ID             varchar(36) not null
) IN BLOGSREGTABSPACE@


Once that change has been made the process needs to start again…


  • Drop database, create database, app grants (for homepage also initdata, and re org and run stats)
  • CR update scripts
  • Pre DB fixer script
  • Run the DBT command

Rinse and repeat until the DB transfers all the tables over correctly. This part of the process took the longest. Working out which tables to remove the not nulls from was SO time consuming. I kept a record of all the tables / columns I changed for my records more than anything else, at least the Post DB fixer script puts things back to the way it should be – and if you do hit issues with that you can manually fix them as you have a record.


ALTER TABLE BLOGS.ROLLERLOGINNAME ALTER COLUMN USERNAME SET NOT NULL;


So hurrah .. after all of that mucking about we have the Connections 5 data from Oracle on AIX in to DB2 on Windows – now what?

Well I backed it ALL up, including the existing V5 DB2 databases Docs, FEB and Projexec and migrated it to Version 5.5.

On the whole this part of the process wasn’t too bad and it was a good test for a real live migration ..


Migrating to Live

The whole migrating to live took about 21 hours in total – including waiting time for the DBs to transfer and the steps were are follows

On the Live5 machines

  • Stop Connections
  • Backup the File system
  • Back up the DB2 databases that need migrating (FEB, Docs, Projexec)

On the Dev5 DB machine (that I had been using for testing)

  • Drop database, create database, app grants (for homepage also initdata, and re org and run stats)
  • CR update scripts
  • Pre DB fixer script
  • Run the DBT command
  • Application specific scripts (IBM provided addional fixup scripts for Blogs, Files and Wikis for me)
  • Post DB fixer script
  • Re org script
  • Run stats script
  • Restore the backed up Live DB2 databases (FEB, Docs, Projexec)
  • Backup the DBs – so we now have a FULL set of V5 DB2 data
  • Copy backups to LIVE 55 DB2 machine

On the Live5.5 machines


  • Stop Connections
  • Drop the DB2 databases
  • Restore the V5 DB2 databases
  • Set numb dbs to at least 25
  • Run the upgrade scripts to update them to V5.5 – ran these manually not using the GUI as the amount of data caused issues
  • Run the CR updates
  • Run the Docs DB2 Fixes
  • Run the FEB DB fixer from the FEB admin GUI
  • Started Connections
  • Cleared the scheduled tasks
  • Post migration steps
  • Restarted Connections

And we were live 🙂

This took WAY longer than it should have done because of all the issues we had with the DBT to begin with .. but hopefully info in these posts will hope anyone who needs to do this pre PINK.

This was a LONG journey – but we all learned a lot in the process of doing this .. the main lesson learnt was don’t attempt this unless you HAVE to 🙂

If you missed the other 2 parts of this series you can find them here:

  • Part 1
  • Part 2
  • Part 3 – this page you are reading 🙂